We’ve been in our home about eight months now. While the journey to contentment and feeling “at home” in this house has been a winding one, I can confidently say that, from today’s perch, I feel so grateful to be here. We have a long ways to go to before this home fully reflects our family’s personality, culture, and needs, but we’re here. We’re doing it, little by little. And I’d love to invite you in to see this at-the-beginning portrait. Shall we?
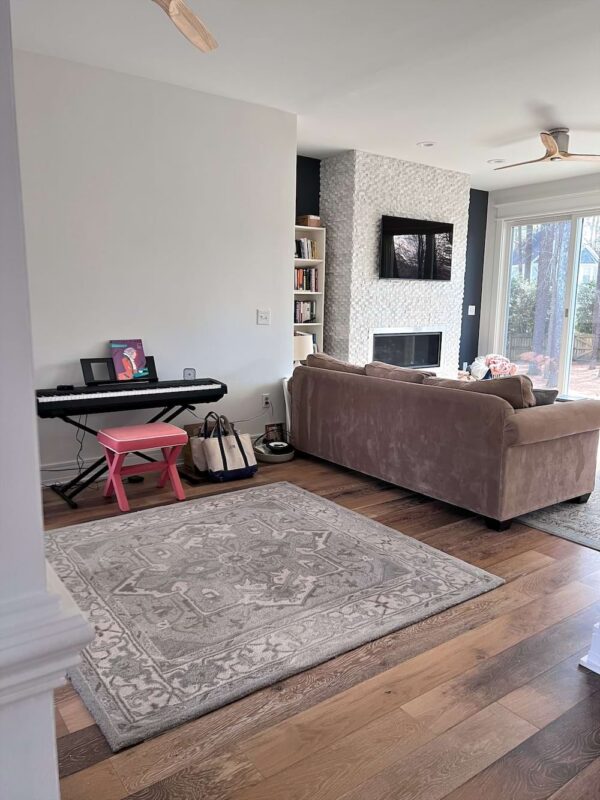
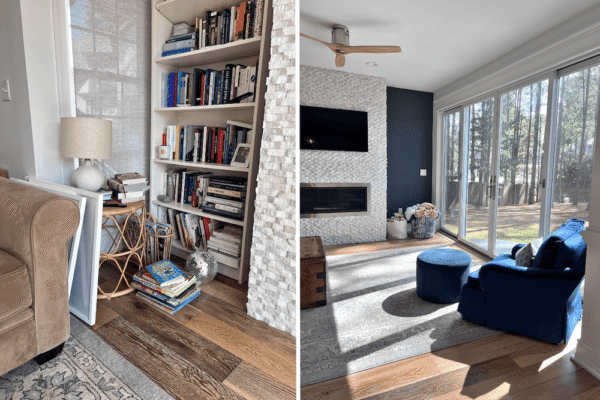
Here is what we’re variously calling the piano room, the library, and the study — even though it currently has no piano and no books. Eventually, I would love to replace the keyboard with an actual piano and hang John’s guitar on the wall nearby, maybe put a little chaise lounge reading nook in the window corner.
You might recognize this rug from our previous foyer. (This whole tour is going to be a bit of a Where’s-Waldo situation for longtime readers!) I don’t know that it will stay here forever, but it keeps things cozier for now. The classic wooden hutch is new to me, from Facebook Marketplace: I sold my navy desk because I needed something taller for this narrow space between the windows and pillar, and I love it. Hilariously, everyone who visits says, “my parents have one of these in their house,” ha. I keep desk supplies, stamps, envelopes, stationery, candles, notebooks, paper napkins, and more in the drawers.
Moving a little further into the room, we have the second half of this space. Same sofa, armchair, chest, bookshelf, etc. from our last house. We are considering whether to do a sectional here, but there is more considering to do. (Plus, that tan beauty, circa 2011, is the comfiest, sturdiest, and most resilient sofa a girl could ever hope for; I’m not sure I could ever part with it.)
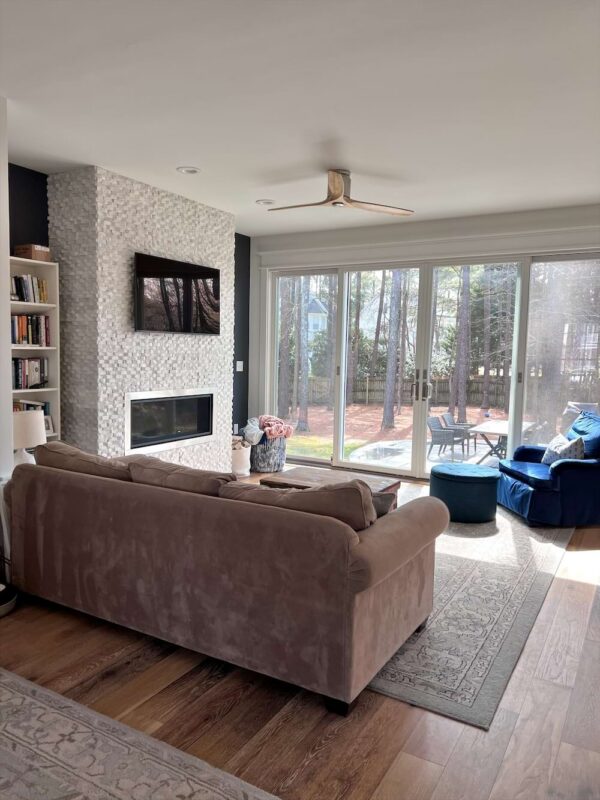
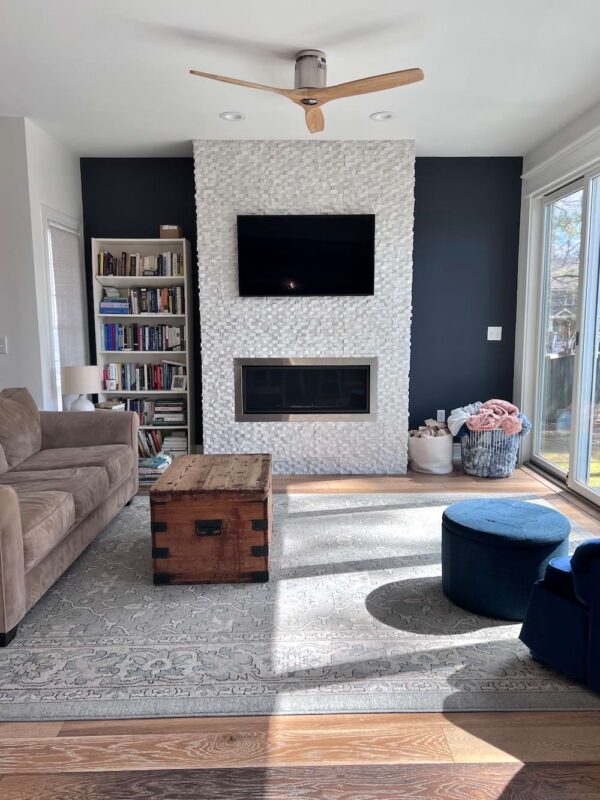
I know some of you will love this fireplace, and I love that! Alas, it was too modern for my taste, and as the centerpiece of our home, I knew something that better reflected our style would change the tenor of the entire downstairs. Spoiler alert: it has! Plus, we needed more storage for books :)
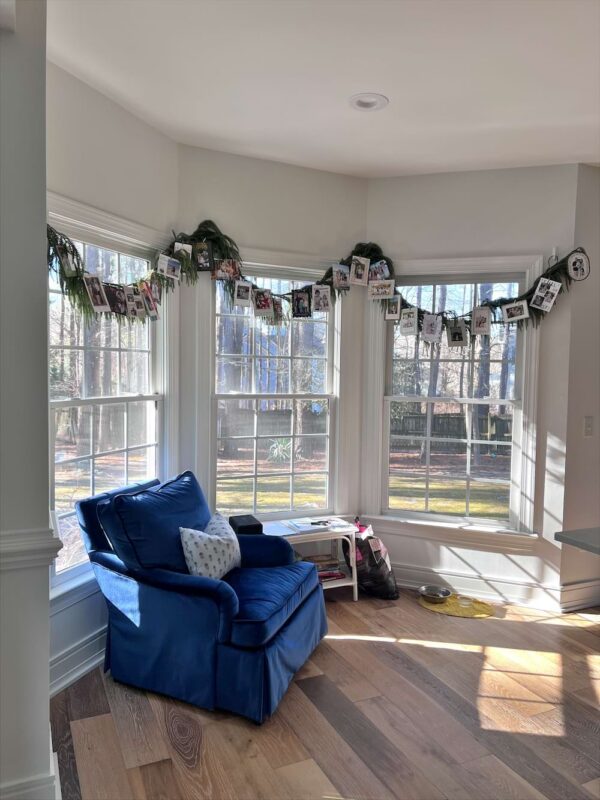
Moving around the corner, we come to this sunny nook. I took these photos over the last few months, but happily kept my – ahem – winter garland up long past Christmas. I just loved looking at the happy faces of our loved ones! We’re not sure what we’ll do long-term with this space – maybe a little breakfast table and pair of chairs? – but right now the other comfy armchair is working great. I keep my planner open on the bench for quick reference, with more books underneath.
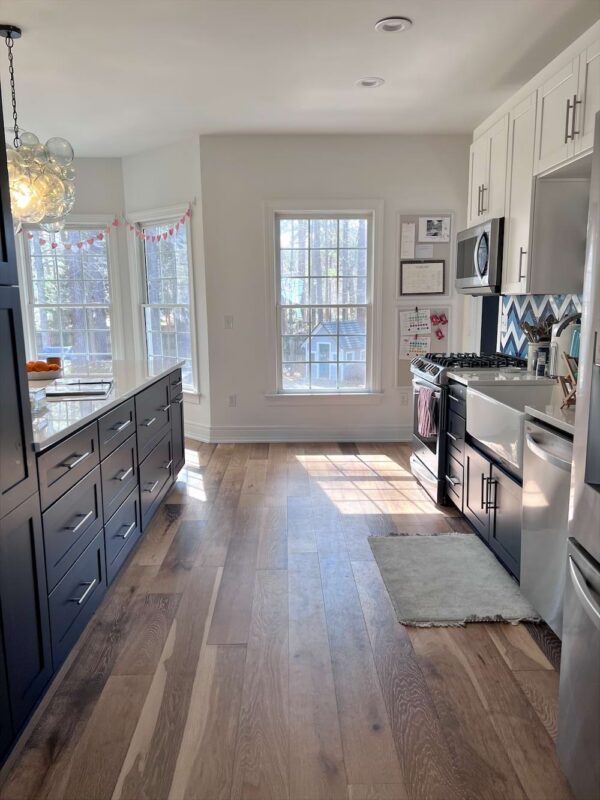
Next door is the kitchen. The previous owner reworked the layout, replaced the cabinetry, widened the door into the dining room, etc., and I mostly like her choices — except, of course, for the dreaded chevron. It will go one day, but I can be patient :) The light pouring in across the whole back of the house is just my favorite.
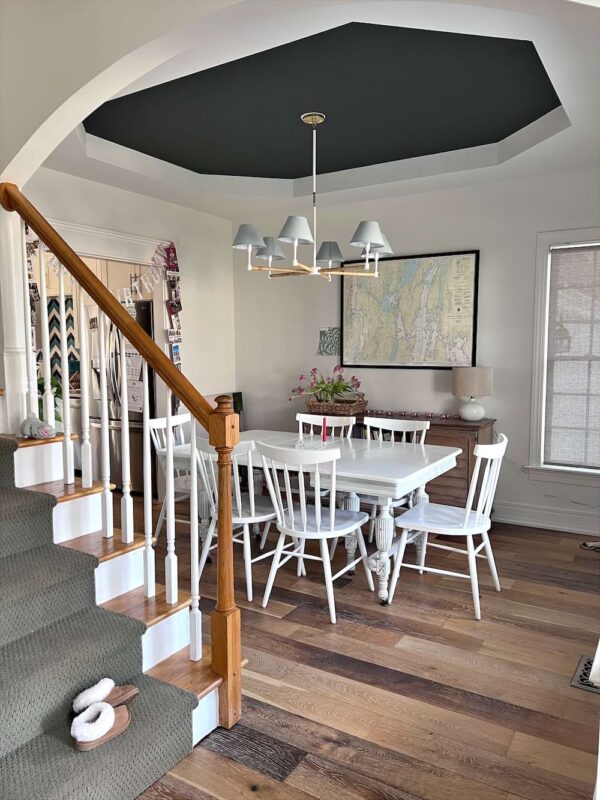
Finally, the dining room! I hung the exact same chandelier as in our old house because I love it so much. Though I’m grateful for the sideboard storage in here (it held our TV in the old house), I think I’d eventually like to build a corner hutch and move it elsewhere to make it a little easier to navigate around the table. And maybe wallpaper, though our bathroom wallpaper saga has possibly sworn me off the stuff forever.
There you have it! If you have any questions about sources or anything else, just leave a comment — I’m more than happy to help.
Many times that I’m writing here, I’m writing to remember a particular time in my life — to make sense of it in the moment and to create a place to reference in the future, should I or anyone else need it.
While I imagine the experience we went through last year — moving a young family from one home to another in middle childhood — might be somewhat singular for me, I still want to record it for posterity. (I say “singular” because while we never know for sure what’s ahead, I can easily imagine a life in which our next big move is as empty nesters. And since our first big move was from an apartment, sans children, that would make the move we undertook last year a singular experience in our life. Which is a crazy thought!)
Still, even if I never need to use my own advice again, we did learn a few things along the way, and I’d love to share them with you. I also know that many of you are seasoned movers with a deeper well of experience to offer than me, and I’d love to hear from you in the comments. If not for my benefit (staying put as I intend to!), then for our fellow readers :)
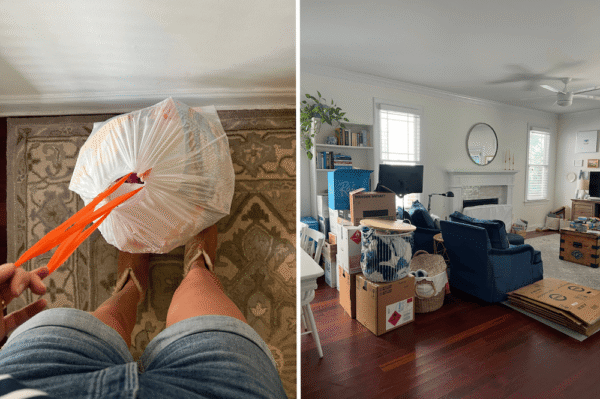
The first bag of trash (OF MANY) and the first collection of boxes to go to storage
How does it work to sell and buy a house?
First, my biggest question when we approached this move was how to order its cadence — when do we put the house we’re selling on the market? When do we schedule the moving truck? — and it was frustrating to feel like I never got a clear, satisfactory answer from any party. Not their fault: now on the other side, I think it’s because there is no universal order that works in every situation. But in case it’s helpful, this was our timeline:
The first week of August: Our soon-to-be-new house comes on the market (while we are on vacation, do not recommend), we make an offer, we make another offer, we make another offer, and it is accepted. We are under contract with a closing date in early October.
Remainder of August: We begin prepping our old home for sale. We declutter belongings and hire people to make repairs and complete final projects or do them ourselves. We begin packing boxes. (I aim for at least one per day.)
September 15: We rent a small storage unit and use it to stash items we don’t want in our home during the selling process (listing photos, open houses, showings, etc.). This includes toys, a few pieces of furniture, our Peloton, decor, and some packed boxes. We rent it for two months.
September 25: Listing photos are taken of our home.
October 1: Another photographer takes new listings photos, since we didn’t like the editing on the first ones. This was a bit awkward to advocate for in the moment but I think it paid off.
October 2: We officially close on our new home and our old home goes on the market – yes, on the same day! We host open houses on Saturday and Sunday and accept an offer on Sunday night. We now own two homes. Since our new home is less than a mile from our old home, we begin moving boxes and more delicate items (plants, lamps, art) in small loads a few times a week.
October 17: Movers come to move our furniture and all remaining boxes to the new house. They also swing by our storage unit to collect the items we’ve stashed there.
This is also the date the sale was expected to close on our old house. As you know, this did not go according to plan, and the sellers back out on this, the last possible day. After some scrambling, we secure a new buyer and go under contract on Sunday night, with a new closing date of November 17. In the meantime, we camp overnight with friends on Friday, then officially spend our first night in the new house on Saturday.
November 17: We say an official, final goodbye to the old house and sign the papers to close.
Our home on the day the listing photos were taken
Tips for working with movers
While we moved our belongings with the help of family and friends when we lived in an apartment, hiring movers was a no-brainer this time around. (For locals, we used Crabtree Family Movers and they were great!) A few thoughts and pieces of advice:
— We kept gatorade in the fridge and welcomed the crew to help themselves throughout the day.
— As soon as the movers showed up, things moved FAST. There was really no time for packing final boxes or getting organized that morning — our house started emptying immediately and the pace didn’t let up. I thought it would go a bit slower and was scrambling to stuff a few final things in boxes!
— The first half of the day (the loading) was fairly hands-off. The second half of the day I was engaged the whole time, standing by the truck as they unloaded, answering questions and making sure every box and item of furniture went to the right room (even though we had labeled boxes!).
— There were a few final items we wanted to move by hand, and we made sure to segregate them in a corner and point them out to the movers first thing. Otherwise, everything will go into the truck before you even realize what’s happening, ha.
— We had cash on hand to tip each guy $40, which we handed to the foreman at the end of the day.
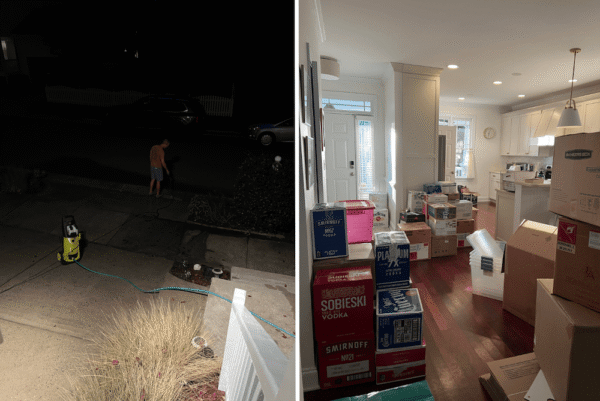
John power washing in the dark after he didn’t like the way the driveway looked after the first listing photos (LOL) and the box situation two days before moving day
Other miscellaneous tips for moving:
— We sourced free boxes from friends, our local Buy Nothing group, and the ABC store. The ABC boxes are a little smaller, but they were great for heavier items like books. I also bought a few larger ones from Lowes. (Good to remember – you can return unused boxes to Lowes!) Because you’re at the mercy of others’ timing, I wish I had started claiming boxes earlier on Buy Nothing.
— Several friends told me they had been able to get good-quality free boxes from Chick-fil-a, but I called several of our local restaurants and all seemed confused by my request, ha.
— As we unpacked, I gave away any boxes we didn’t want to keep on Buy Nothing. Much easier than breaking them all down!
— We mowed our lawn one final time just before moving the mower, to hopefully keep the grass at a reasonable level for the new owners.
— I kept a few extra, empty plastic tubs on hand on moving day to corral last-minute items. Highly recommend.
— Several of those tubs were used to pack sleep things. As soon as we got up on moving day, I stripped everyone’s beds and ran all the sheets through the laundry (at the old house). I packed the fresh sheets, blankets, and pillows and all other sleep necessities — white noise machines, Yotos, pajamas, stuffies, John’s sleep mask — in the same tub. That first night at the new house, we put on a movie for the kids and John and I worked together to get everyone’s bed set up: sheets on, pillows fluffed, stuffies in place, white noise machines plugged in. It took the whole 1.5 hours (longer than I thought!) to get it done, but but working together with John that night in our new home is actually a very sweet memory.
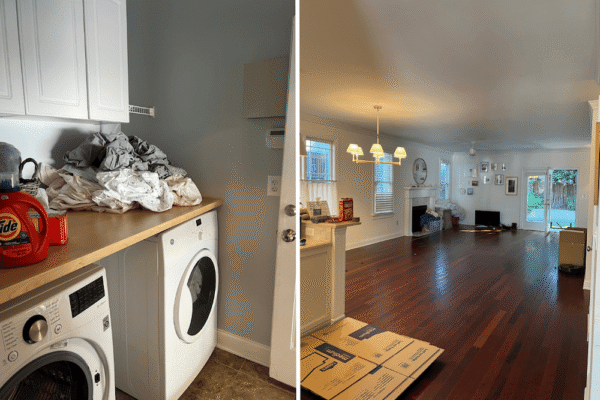
Doing the laundry one last time at our old house and the main room after the movers descended
— Since we camped on Friday night, our first official night in the new house was Saturday. Friends from church offered to bring us dinner that night; I didn’t think it would be that big of a deal but it really was! First, to have dinner taken care of, but also to have friends in our home even briefly really made it feel like home. On Sunday night, when things were still disheveled, we ate a premade meal for dinner (locals — from Donovan’s Dish), which was also a great call. By the time Monday rolled around we had groceries in the fridge and though we still kept meals really simple, cooking was more feasible.
— One of the most surprisingly refreshing parts of moving was looking at everything that had hung on our walls with a clear eye. I find it hard enough to commit and actually get something hung; once I do, I basically never switch it out. So, after 12 years, it was a delight to be forced to consider whether we actually still wanted each piece on our walls! It’s been a slow process in the new house, and we still have much to hang, but I’ve enjoyed releasing pieces we no longer want on Buy Nothing.
— In the packing process, we emptied many bins and baskets as we filled boxes. We collected all those containers and kept them in a central place in the new house (a stairwell), which made it easy to “shop” for the container we needed in the new house as we unpacked. Most things did not go back into the same configuration as they had in the old house.
— In general, the new house has necessitated lots of new solutions, and shedding of the old. There was an acute two-month period where I was doing a lot of selling items on Facebook Marketplace or giving them away in our Buy Nothing group while also buying new items for new needs. We still have a ways to go in the new house, but the initial flurry has died down.
Finally, something to prepare yourself for: the things you suspect might be an issue when you’re considering a house might very well be an issue once you’ve signed on the dotted line. For example, the thing I was most worried about in advance of our move was the square footage of the dining room. While well-sized for daily dinners, I worried it would be a tight squeeze when gathering the twelve gals of Articles Club or a family with kids. I was right. We make it work, but just as you’re likely to be disappointed hoping your partner will magically change after a wedding, so it is with a home sale.
On the other hand, you might find there are surprises and delights around every corner. As you know, I felt very conflicted throughout the moving process, and into our first few weeks in our new home. I worried if we were making the wrong decision. I missed our old home and our old neighbors. I was desperate to make changes to make our new home feel like “us.”
Now, six months in, I feel like George Banks on the regular: “I LOVE this house,” I think, as I turn onto our cul-de-sac, windows down, front yard maple coming into view. I love how it looks, I love how it feels, I love all the light, I love the backyard, I love that this is where we get to raise our kids. I hope we’re here for a very long time, and I am so grateful. So if change is hard for you, and moving has you in a tizzy, there is hope.
Alright — what would you add? I’d love to hear. xo
P.S. I originally planned to include new home photos in this post, but it got too long and it felt right to give airtime to these in-process photos, instead! A little tour coming soon.
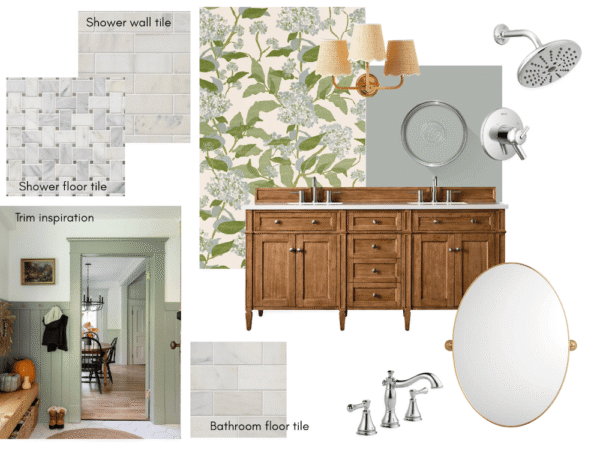
Short and sweet today! I thought it might be fun to share a little bit of the inspiration for our master bath renovation – which, as of last Friday, is officially underway!
As some of you might remember, we were on the cusp of doing a master bath renovation in our old house until a stalled contractor and then our move changed our plans. I’m so grateful that the timing worked out as it did, both because we saved money we didn’t need to spend at our old house and because we’ve already done a bunch of thinking about bathrooms that’s served us well in our new house. And in a full-circle moment, we’re using the same contractor.
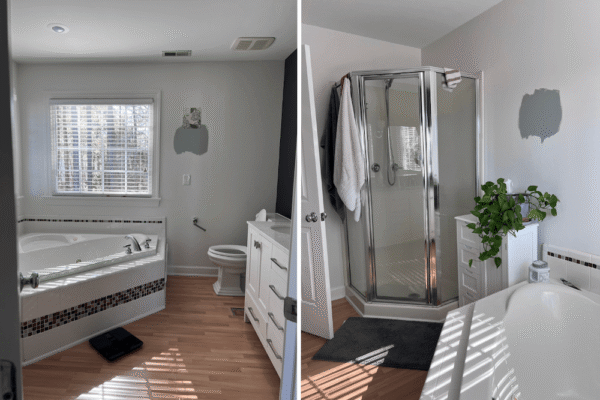
The plan, in short: we are taking out the tub, enclosing the toilet, moving and enlarging the shower, and moving the vanity — plus switching out the tile, adding millwork and wallpaper, and replacing the fixtures. I am excited and grateful. A peek at the before:
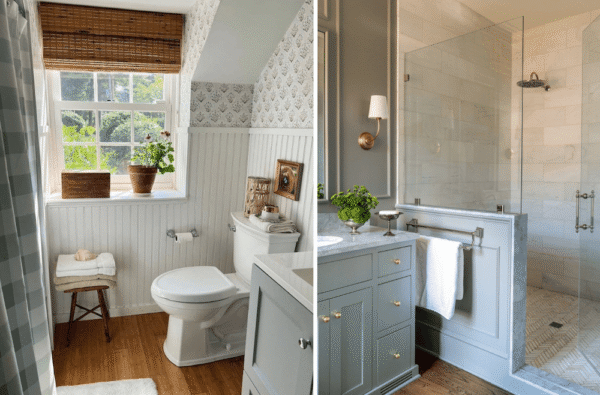
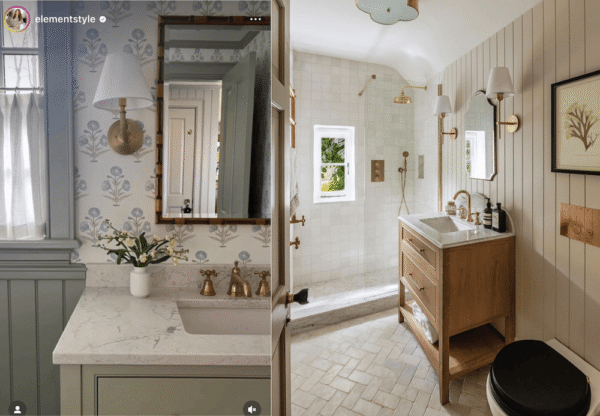
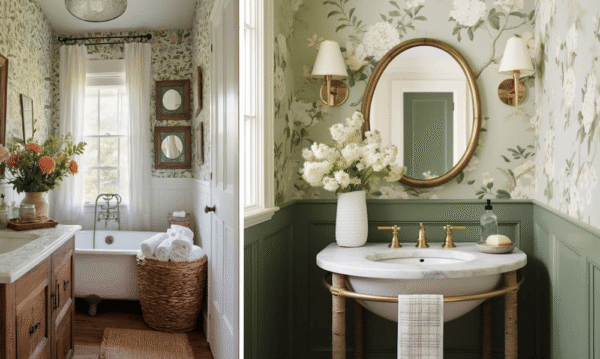
Here are a few inspiration photos. None are exactly what we have planned, of course, but they should give you an idea of the direction we’re headed:
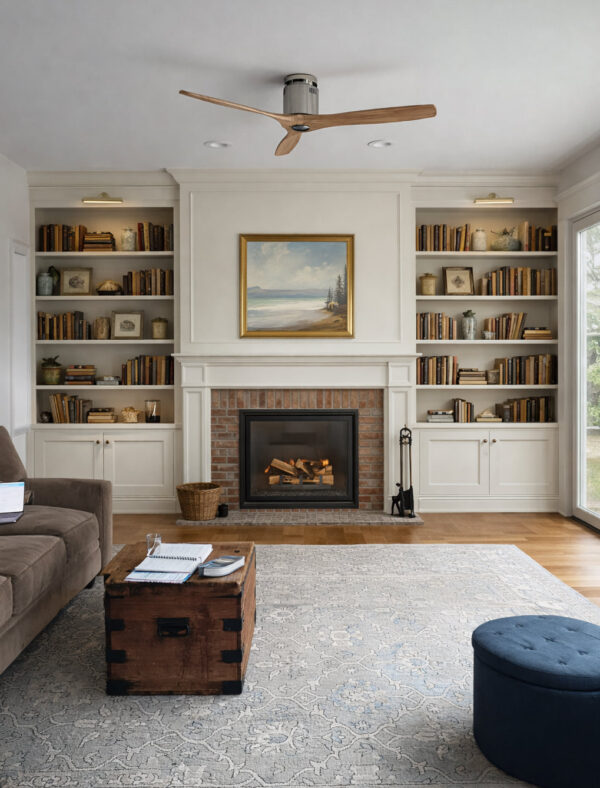
While the crew is in our house, we’re also having them add built-ins to our main room. Since this space is so central to the downstairs, I hope this change will really set the tone for the whole floor and make our next steps clearer. It also will give us a mantel (yay stockings!) and of course much more closed and open storage for books (so many books!), games, and toys. Again, I am excited and grateful.
Here’s a rough mock-up of the plan I made with ChatGPT. It’s not quite right, but gives you an idea of what we’re going for!
Will try to share more as we go! Let me know if this was enjoyable — trying to push myself to share shorter posts so I can publish a bit more frequently :)
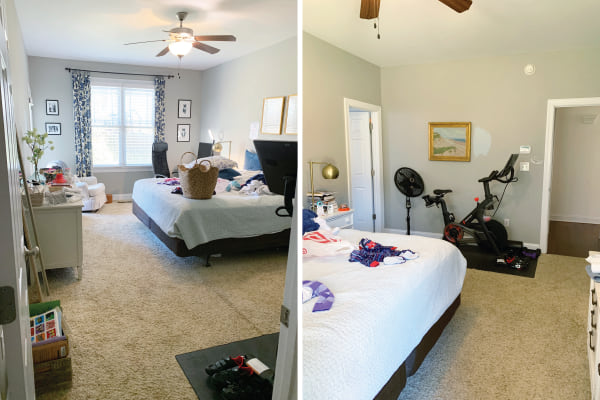
About a year and a half ago, I shared inspiration for our master bedroom refresh. As often seems to happen with these more private spaces (as opposed to the more public spaces that everyone enjoys), our bedroom wasn’t at the top of the priority list (even though it is very much a hub of family life). We have finally completed what we set out to do, though, and I’d love to share the finished space with you today!
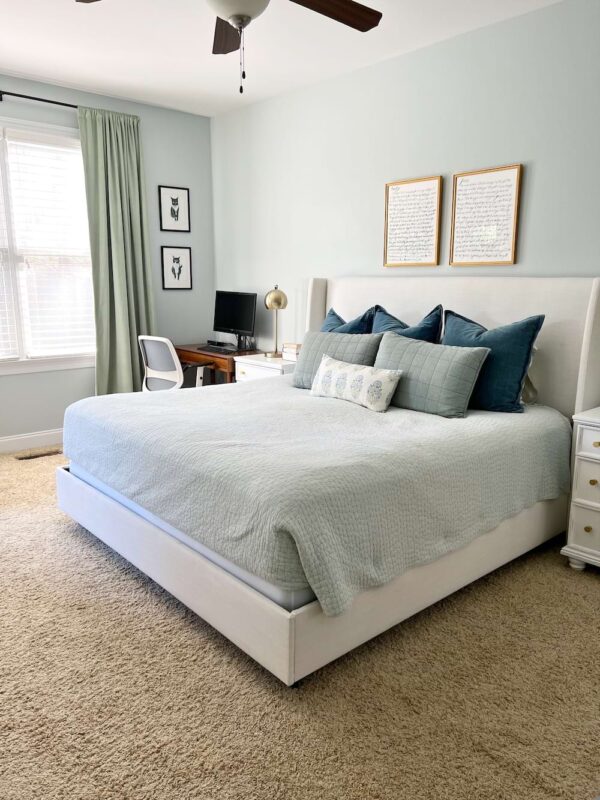
To refresh your memory, here’s where we started:
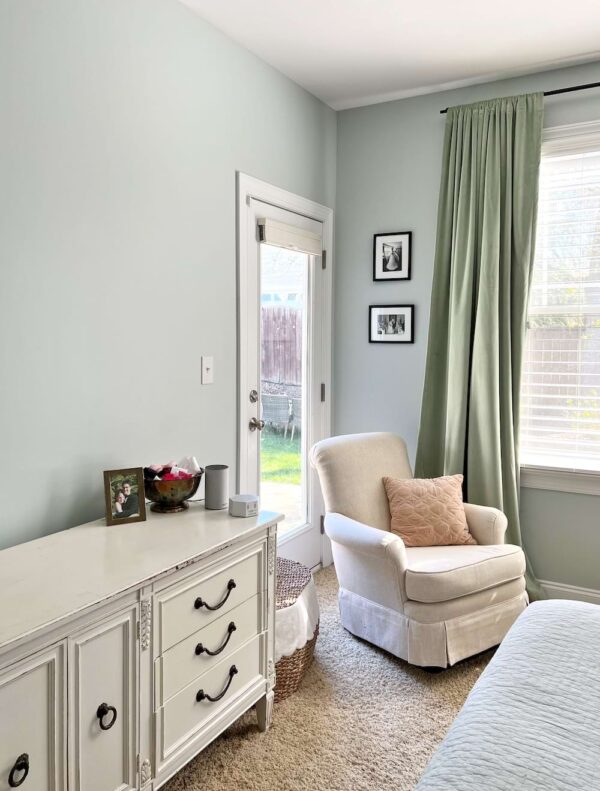
As we discussed, this room does A LOT. It’s where we sleep, obviously, but it’s also where our kids’ clothing is stored, where they get dressed in the morning, and where they pull on their jams at night. It’s our workout area, where our Peloton and weights live. And on top of all that, it’s John’s office 3-4 days a week. While it’s a good-sized room, again, that’s a LOT.
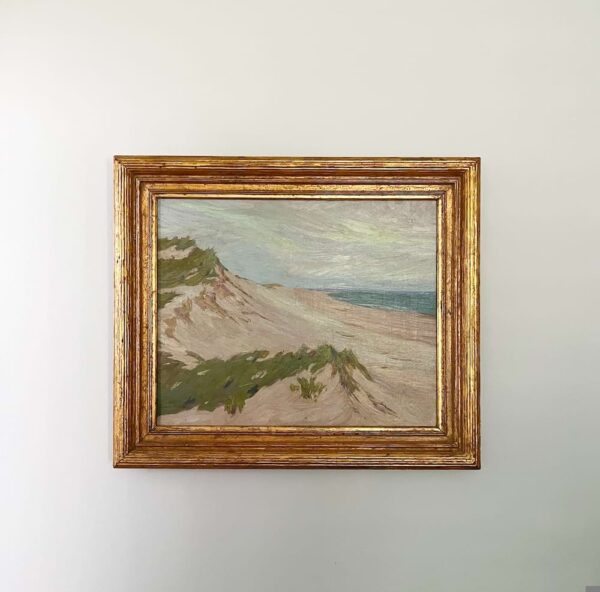
Here’s the landscape painting that inspired the color scheme. This was my gift to John on our wedding day eleven years ago – it reminded me of the dunes near his family’s cottage in Michigan. It has hung in our room ever since.
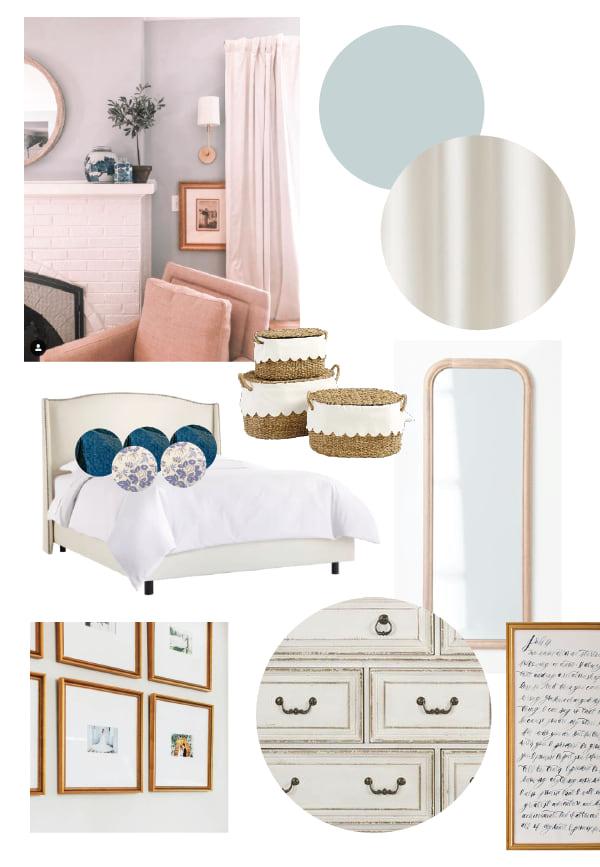
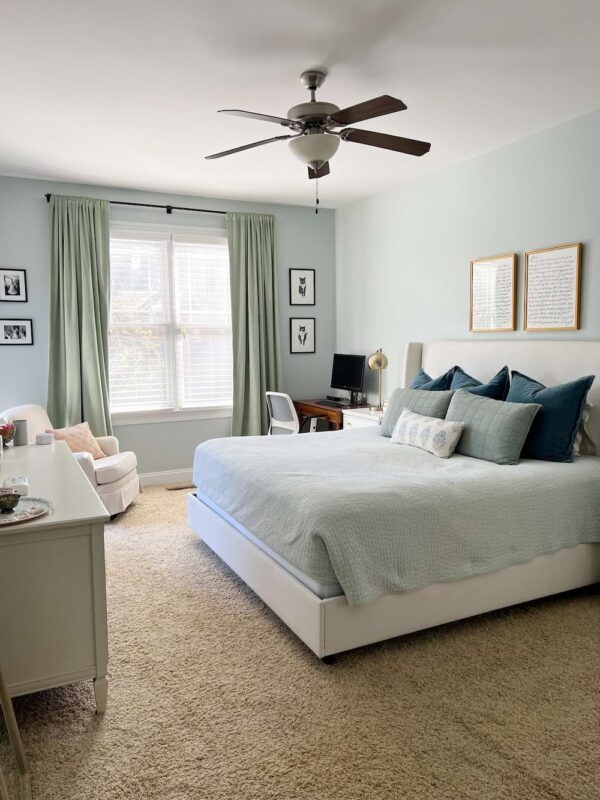
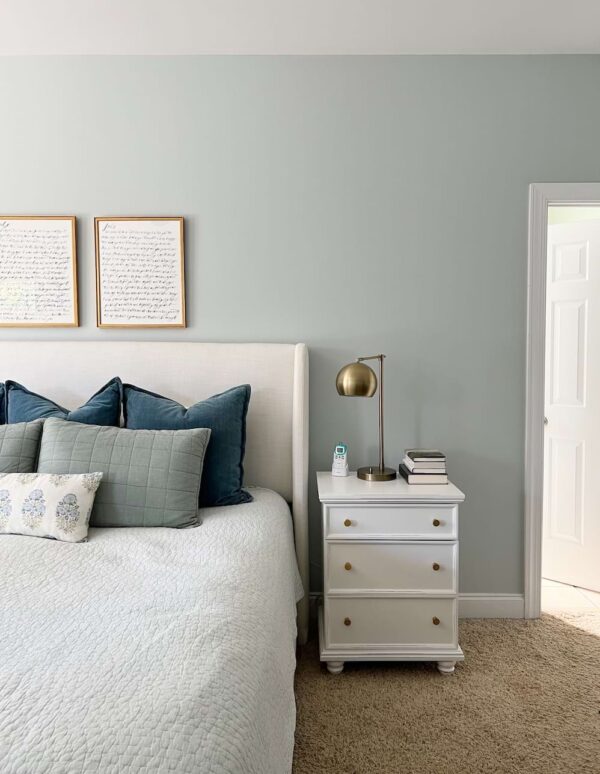
And here’s the after!
Ahhhhhh. It turned out even better than I had hoped :) Here’s a little breakdown of what we did:
We painted the walls. Thanks to longtime reader Emma, we went with Benjamin Moore Pale Smoke and I think it is the perfect color for this space – calming and elegant. We hired our handyman to paint and it was 100% worth it, as always.
We bought an actual bed (!!!). Those of you who have been here awhile know this deserves all the exclamation points. I think I started talking about wanting a real bed in 2013, ha! After much debate, we went with the Charlotte bed in Zuma White, which now appears to be called the Tilly bed. We have been so happy with it!
We refreshed our bedding. We kept the same quilt (not replacing that puppy until our kids are out of diapers, ha!), sheets, and big blue pillows, but added the green shams (in sage green) and floral pillow. (For the latter, I went with the 12×24 size and 100% should have gone larger for our king bed. Was trying to save money but wish I hadn’t in this instance :))
We switched out the curtains and hardware. I splurged on these custom curtains in an extra-long length so we could hang them high and I think they make the room. Sometimes I turn the corner and they practically stop me in my tracks, truly! We got blackout lining (rod pocket style) and the quality is excellent. We paired them with this curtain rod – simple and classic.
I have recently been thinking a lot about what a blessing our mortgage is. We’re just past a decade in this house, and in some ways, it seems so crazy that we’re still paying essentially the same amount each month when rent, home prices, and interest rates have soared all around us. It certainly eases the pain of squeezing a bed, home gym, double closet, and office into one room :) Would this multi-purpose room be our choice if money were no object? No. But it is certainly the right fit for right now, and for that we’re grateful.
It’s not too often you invite a bunch of friends over for a tour of your bedroom, but here we are! I hope you enjoyed it, and perhaps leave encouraged that it’s taken us over a decade in this house to get to this point :) Of course, as always, please let me know if you have any questions – I’m happy to help!