Em’s guide to photo organization, part two: digital photos
Part One: Physical Photo Organization
Part Three: Printed Photo Albums
If I had to guess, I imagine most of the people who’ve messaged me over the years asking for help with their photos were interested in this part of the process: digital photo organization. It’s awfully overwhelming, isn’t it? We take SO! MANY! PHOTOS! these days! It’s kind of shocking to compare the number of photos I took ten or even five years ago and the number I take now. (For example, we have 1,000 photos backed up from 2014, and 6,000 from 2019!) Of course, I had two adorable children in that time, which certainly doesn’t help.
I do feel like I’ve gotten my arms around the situation, though, and I’m happy to lay things out for you today. The good news? It’s not hard! You can totally get your photos organized, and set up a system to keep them organized going forward. The bad news? In my experience, it’s a looooooooong, tedious process. Little by little, though, you’ll get there!
Here are the steps I took to get our digital photos under control.
Step 1 | Choose a photo back-up system.
Though the actual organization of our photos has been great, this first step of backing them up was by far the most important to me. If you do nothing else while reading these posts, take this action! After considering various options, we chose to back up our photos with Amazon Photos. Unlimited photo storage is included with your Prime membership; we chose to pay $20 more a year to get 100 GB of video storage, as well.
The system is super easy: download the Amazon Photos app, and every night you’re connected to Wi-Fi it will automatically upload your photos to your Amazon account. You can view them in the app or on a desktop through your Amazon account.
A really wonderful aspect of this solution is that both my and John’s phone photos back-up to the same account, so all of our photos are consolidated in one place.
Though Amazon gives you various options to organize your photos (folders, etc.), we don’t bother with any of that. I consider Amazon our “peace of mind” back-up, so I pretty much just let it run in the background and do its thing, knowing that my photos are secure no matter what happens to my phone. Hallelujah!
Step 2 | Order an external hard drive for secondary back-up
For precious photos, one back-up isn’t enough! Next, I put in place a system to make sure our favorite photos were narrowed down and neatly organized. Whereas Amazon is storing the outtakes, random photos the kids take, and all 158 angles of back-to-school photos, the hard drive is reserved for the favorite and best. Now, if in a few years I’m looking for the best photos from, say, June’s first soccer season, I’ll know right where to go!
We chose the Seagate 2TB External Hard Drive (and this handy case for it). It’s about the size of my hand and has been great so far!
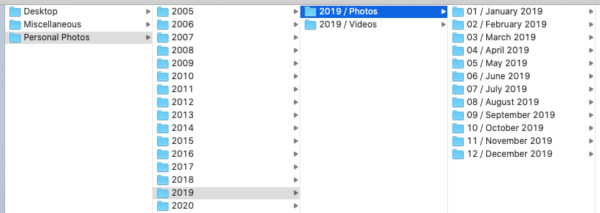
Step 3 | Create a hierarchy for your hard drive
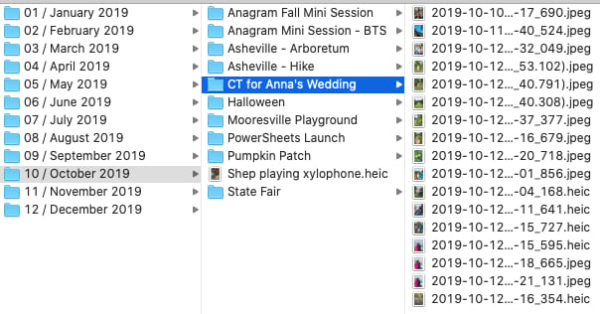
This is your standard system to keep things organized. Mine is Personal Photos -> Year –> Month –> Event. An event is any occasion with more than 1-3 photos – it could be as momentous as a birthday party or as small as a weekend hike. Some months have 1-2 events and others have 8-10. If there are stand-alone photos from the month that don’t belong in any event, I’ll give them a descriptive file name so I can find them easily when scanning folders later.
This is what it looks like in practice:
And here’s what it looks like inside a month and an event:
Step 4 | Centralize all “random” digital photos onto new hard drive
This step may or may not apply to you, but I had a few older external hard drives, folders on my computer, and CDs/USBs with photos that I needed to consolidate into my new system. This included sorting them into the right event folders and editing/culling them as necessary.
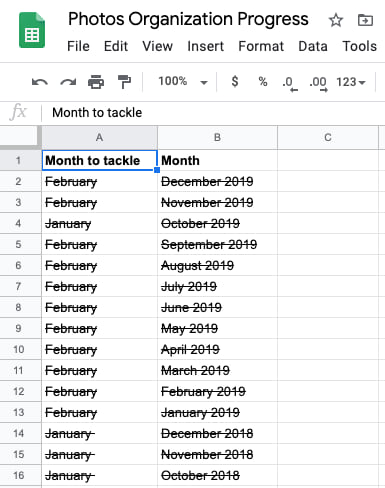
Step 5 | Month by month, sort, cull, and edit photos into hard drive system
Ah yes, the step that took me two years :) Oh so slowly, I went month by month through 14 years of photos, using a Google doc to keep track of my progress. (It went on like this for 170 lines!)
For each month, these are the steps I took:
— Download the photos from that month from Amazon Photos
— Sort photos into events, creating new event folders as necessary
— Go through each event folder and delete outtakes, unimportant photos, and multiples until I’m left with the best and favorite photos from that event.
— Edit remaining photos as needed (using either Photoshop on my computer, or PicTapGo on my phone)
— Name any stand-alone photos
— Manually delete the photos from my phone
Whew!! It’s simple — but depending on your backlog, it can be a lengthy process. Each month, I’d tackle a year or two (the later years took MUCH longer). Now that my backlog is complete, I sit down every quarter or so to sort, cull, and edit the photos from the past few months.
Organizing my digital photos teed me up for the final step in my photo organization project: creating photo albums! That’s what I’ll cover in the final post in this series.
Friends, I’d love to hear: was this helpful? If you have a system for organizing your digital photos, is it similar to mine? Or do you do something even more brilliant? :)
Affiliate links are used in this post!


Mine is super similar to this! Thanks Nancy Ray! But downloading the monthly photos from Amazon backup is the genius key I have been missing! Thank you!
Ahh, I’m so glad to hear it!
Wow! This is so helpful and great to know. I currently have a bunch of photos on Shutterfly because I used to use it to order photobooks for family and such. I want to get all those on an external hard drive now I am thinking and get it all organized! It’s all such a process. Thank you for the all this!
You’re so welcome, Carrie! It’s certainly a process but you can do it!!
Agree about the downloading from Amazon to your computer. My issue is always how to get them off of my phone and my husband’s phone. I’d love to try Amazon Photos and would welcome a tutorial of how you download them / use the app from your phone and computer. Maybe even just on Instagram Stories!
Also, when you’re done with a particular month, how do you delete all of those photos from your phone? Do you have to go one by one?
Thanks! This has been on my goals list for 2+ years!
And one more question – when you delete the photos from your phone, are they also deleted from Amazon Photos? Is that part of the syncing process?
Thank you!!!!
Hey Maureen! It’s super easy. To download from Amazon Photos for this process, I do it from my computer – you just go to Amazon in your browser and download from there. When I’m done with a month, yes, you have to delete them all manually :/ If anyone knows a better way, let me know, ha!! If the photos are synced (which happens automatically and/or whenever you open the app – I’m sure you can change the settings!), when you delete the photos from your phone, they are NOT deleted from Amazon photos. You can delete photos manually from within Amazon Photos but once they are synced they’re there even if you delete them from your phone!
There is an app called flic and you still have to go through photos one by one but it is much quicker. The free version lets yip go through 100 a day (I think) but you can upgrade to the full version and I am pretty sure you get unlimited photos.
Thanks Emily! Finally downloading all of this today! May I also ask, how do you get your and John’s photos to sync to the same Amazon photos account? My husband and I both logged in to our accounts and it seems to be syncing them separately even though we share one Prime account. Thanks!
Maureen
I am so thankful for this post-I have forever wondered how to compile my and my husband’s iphone photos. Amazon photos here I come!
So glad, Caitlin!! Yes, it’s such a seemingly small thing, but makes it SO much easier to keep things organized!
Hi Em! This was helpful in several ways! Thank you! I have a similar system in place, but so far that’s mainly for photos from my „real“ camera. And I totally agree: once you have a system in place it’s so easy to maintain going forward. But it‘s the iPhone photos that get the best of me. Phew! I will definitely give Amazon Photos a try. I‘ve been considering that and now you just gave me the positive review (or kick in the bottom) that I needed, ha!
We’ve used it for at least a year and it’s been great! Glad to find a system that works!
This is amazing, and so helpful!! I back everything up into iPhotos but it definitely isn’t as organised as this and takes a lot of storage!