What is a household or parenting task other people hate, but you actually really enjoy?
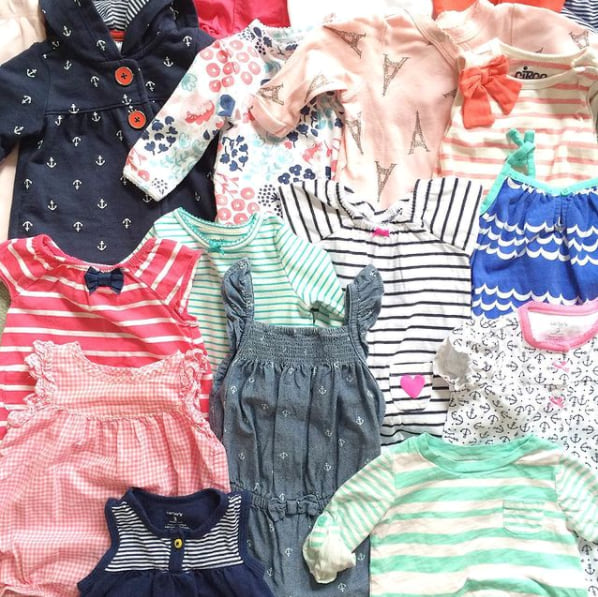
For me, it’s organizing my children’s wardrobes. No, I don’t mean shopping for them or picking out outfits (though I do enjoy those things, too!) – I mean the nitty-gritty of making sure they have the right amount of clothes that fit and are seasonally appropriate, at the right time, in the right place (and managing the steady size drip of too big –> just right –> too small). Throw in hand-me-downs and donation piles and rips and stains and what to keep for posterity and kid clothing management can get overwhelming quickly (especially when you have multiple ages and genders to wrangle!), but I’ve found a simple system that has made this process a breeze and, yes, actually enjoyable. Since many of us are in the process of switching over our kids’ wardrobes from fall/winter to spring/summer, I thought we could chat about it today!
Here’s what my process looks like:
— We are lucky to get 80% or more of our kids’ clothing from my older sister, who has a girl a few years older than June and a boy a few years older than Shep. (Thank you, Jesus!) Whenever she delivers a fresh load, I go through it immediately and return to her anything that’s not our style or that we don’t need. Clothes that are too big go in a designated spot. This could be a bin in the closet or a box in the attic – for us, it’s the drawers in June’s dresser (one for each kid). Gifts that are too big or for a future season go here, too.
— Clothes that fit and are in season are stored in John’s and my bedside tables – more about that here.
— Whenever a piece of clothing is too small, too worn out, falls out of favor, or no longer fits the season, it goes in a big bin under June’s bed. It doesn’t matter where it came from, who it belongs to, or what will happen to it next – it just gets tossed in the bin. This eliminates SO MUCH decision making on a daily/weekly basis!
— Once in the spring and once in the fall, I pull out the under-bed bin, dump everything on the floor, and sort through it. (I usually time it to coincide with my favorite consignment sale!) I make several piles:
1. Favorite items that will be saved for our future kids or nieces/nephews. This pile is generous – we have plenty of room for storage and I promised my younger sister I would hang on to all the good stuff until she’s ready! This is not just a few pieces for posterity. These get stored in big labeled bins in the attic, sorted by size and gender. 2. Items to return to my older sister. This is generally pieces we didn’t end up wearing much – she consigns whatever I send back her way! 3. Items in good shape we no longer want or need. These get set aside to tag for the consignment sale. 4. Items that will fit next season (for example, June wore many of the same dresses this winter that she did last winter). These go back in the dresser in June’s room. 5. Items to donate or give away. This pile is usually small, since I try to consign most things, but sometimes includes items that are out of style or too annoying to tag (socks, etc.). 6. Items to toss. Things with holes or stains.
And that’s it! Clothes for the new season get moved from upstairs to downstairs, the piles are dispatched, and we’re good to go for the next few months! It’s super simple, but that under-the-bed bin is a true game-changer and makes upkeep so simple.
Now, of course, I’d love to hear: what is a household or parenting task other people hate, but you actually really enjoy? If you have any questions about kids’ clothing management, I’m happy to answer those, too :)
With so many of us planning road trips these days, and spring break coming up, I thought it might be helpful to share some of our family’s tips and tricks!
John and I love a good asphalt adventure, and once our kids joined the party, we kept right on rolling. June clocked six significant road trips in her first six months of life, we’ve been known to make multiple 10+ hour road trips in a summer, and I kid you not, when we asked June what she was most looking forward to about our upcoming trip to Jekyll Island, she said, “the car ride and the pool.” In that order. So those are our credentials, ha!
One thing to note up front: our kids (currently 5 and 2) do not have or use personal devices (iPads, etc.). A few further things to note:
— If your kids use devices while traveling and you’re happy with the situation, great! You do you. This is not a moral failing and you do not need to explain yourself to me or anyone else, ha!
— If your kids use devices while traveling and you’d rather they didn’t or you’re considering going screen-free, I’ll be the first to encourage you that YOU CAN DO IT! Yes, there might be a rough transition period. Yes, it requires a little more prep and parental engagement. And yes, even once you’re well into it, it’s not always going to be pretty (best to keep your expectations in check!).
For us, though, the benefits outweigh the negatives — benefits like increasing our kids’ patience, attention spans, resilience, and capacity for wonder. We also think it helps them learn to accept uncomfortable situations with good humor and to make friends with boredom, and can strengthen our family bond. (You might find other ways to accomplish these things, if they’re important to you!)
— If you’re traveling solo with kids, all bets are off (almost!). A short (2-3 hour) trip? Sure. Experienced screen-free kids? Sure. Older, more self-sufficient kids? Yes. But the mechanics of parental involvement just become much more complicated when you’re trying to drive at the same time as facilitate.
— I can see a future scenario where we might play a movie on my laptop for both kids to watch for a portion of the trip. Again, you do you!
— This post is specifically about car trips. We have no problem with our kids watching something on a phone, laptop, or back-of-the-seat screen on an airplane because we travel by air MUCH less frequently (so it’s a fun treat) and in an airplane, our neighbors don’t have a choice about sitting near us, so we want to be extra courteous and quiet :)
In short: going screen-free while traveling by car might be harder at first, but it gets easier – and you’ll hopefully find the foundational skills you’re building will pay off in a BIG way down the road.
Now, on to some of the practical tips we’ve found helpful for keeping our preschoolers happy and busy while cruising the highways and byways!
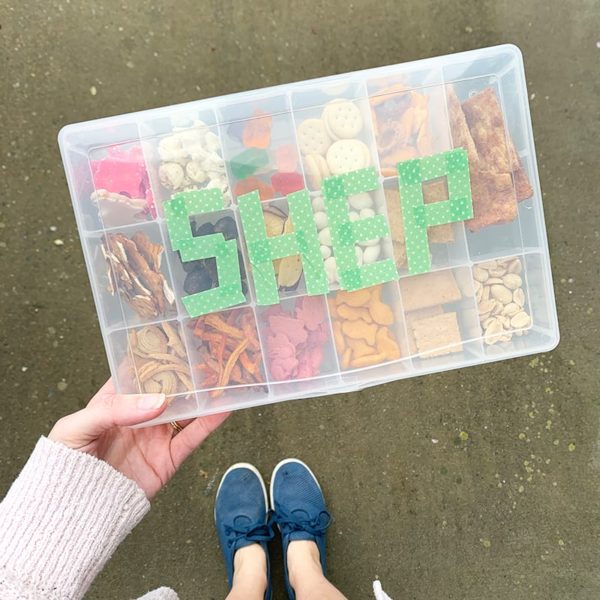
1. Pack great snacks. I am not overly concerned with health or redeeming qualities in road trip snacks, though a variety is helpful to keep things exciting! Goldfish, gummy bears, graham crackers, peanut butter crackers, apple chips, popcorn, blueberries, granola bars, and applesauce pouches are all popular with our crew. In the past, we’ve packed larger bags and brought snack cups to parcel them out, but for this trip I think the kids are old enough to handle individual snack boxes. I ordered these boxes and am going to add their names to the tops with washi tape! I think this will be VERY exciting and keep them busy for awhile.
[Updated to add: here are the boxes in action! They turned out to be a little excessive, ha. The 17 compartments were like snacks for a week for our kids!! Might try repurposing them and getting these for next time, which can be reconfigured.]
P.S. Don’t forget favorite snacks for the parents, too!
2. Pack fun activities. Each of the kids has a L.L. Bean tote bag that I pack with special activities – a mix of their favorites and brand-new surprises. (We have the open top Boat & Totes in size medium – I would size up to larges if I had a do-over!) The bags fit perfectly on the floor in front of a car seat and are easy to access with the open tops. This is helpful since at their current ages I am usually the one meting out the activities, though I’m sure that will change as they get older.
For this trip, June’s bag will include a few favorite books (including an I Spy one like this), a few ponies, coloring and activity books (Octonauts!), a paint-by-sticker book, her Paw Patrol coloring pad, her pouch of markers, printables, and the Guess Who travel game. (A new addition for this trip! The passenger will play with her – Shep isn’t ready to partner yet.)
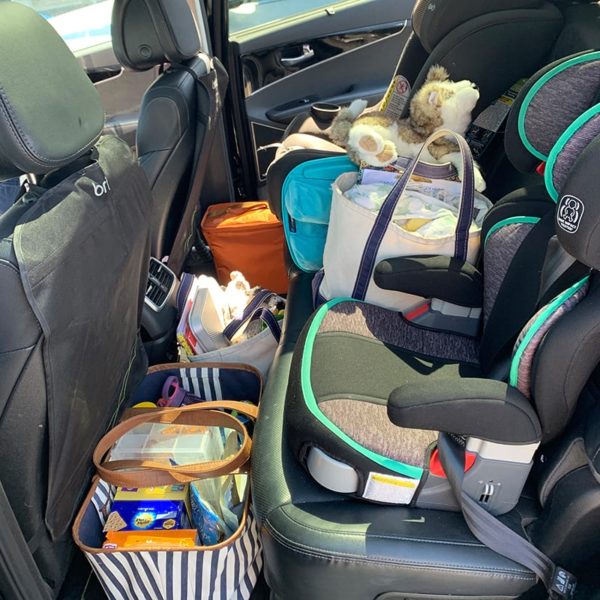
Since one of you asked, here’s what the second row of our packed car looked like on a recent trip! Snack tote underneath June’s feet (she can rest her feet on it), Shep’s tote within my reach (on the floor), and June’s tote in between the car seats. Cooler on the floor in front of Shep!
3. Be ready to actively engage. Like I mentioned above, going screen-free (especially at this age) means you can’t just disengage and expect to have a distraction-free trip to indulge in your own book, listen to podcasts, or catch up on your magazines (all personal favorite road-trip activities pre-kids!). You might have small pockets of time to dip into these activities, but much of the passenger’s time is spent facilitating. Some activities that have been popular with our crew:
— Reading books from the front — Playing family DJ (taking turns picking songs in a rotation) — Singing songs — Playing I Spy or The Alphabet Game (where you choose a category (animals, foods) and name something in that category for every letter) — Listening to audio books of the kids’ choosing (Narwhal and Jelly was a hit last time).
4. Prep your car. I like to take my car to the car wash a few days before the trip and vacuum it out. This makes me happy (ha!) and is a good excuse to make sure any junk is cleaned out so we have a clean slate at the start. Otherwise, make sure you have your reacher grabber (here’s why), several small trash bags, and have stocked the backseat with lap desks.
5. Stop along the way. Build in time to stop for meals and running around. We always try to find a park, a playground, a nice rest area, or just a patch of grass where we can picnic and stretch our legs.
6. Remember that you set the tone. In the weeks and days before a trip, we talk enthusiastically about how much we’re looking forward to the road trip itself, how we love road trips, and how it’s going to be a great adventure. We compliment the kids along the way whenever they’re behaving well, try our best to keep positive attitudes ourselves, and remember we’re on the same team. And we try to make it fun! For example, when we were all packed and buckled but before we pulled out of the garage, we all put our hands in a pile and shouted, “1, 2, 3, GO TEAM THOMAS!” Cheesy, but preschoolers love cheese :)
I know most of these tips are very specific to the preschool set, but I hope they’re helpful if you have littles in that age range! If you’re traveling with an infant, this post is for you. I have many more road trip ideas for older kids, but we’ll save those for a future post! :)
I would LOVE to hear: what road trip tips and tricks, kid-related or not, have you found helpful for smooth travels? Any upcoming road trips you’re looking forward to?
Okay – the weightiest matter is out of the way. Let’s move on to discussing a more lighthearted crossroads – and one that we did not have to make any decisions about, ha! Once we knew we were expecting a third baby, the next question, of course, was whether Baby Thomas would be a boy or a girl!
With June, I just knew from the beginning that she was a girl. With Shep, I said I didn’t have a strong feeling, but I think deep down I knew he was a boy… but just didn’t want to admit it because I was hoping for back-to-back girls. (Obviously, so happy he turned out to be who he is! :))
With a boy and a girl already in our family, the stakes felt pretty low to us this time around. Throughout the first half of my pregnancy, neither John nor I had strong feelings, and neither of us had a strong preference, either. (If you’re surprised by this because you’ve read my About page, know that my super power of guessing baby genders is most accurate for first babies – after that, I’m about as good as the next person :))
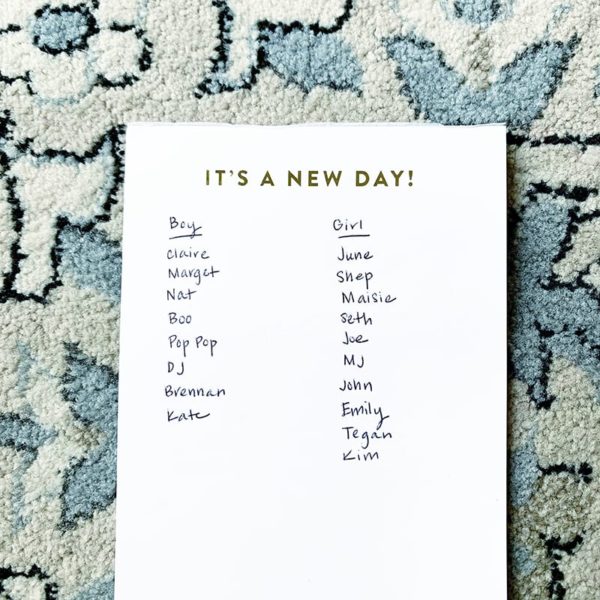
Just for fun, here were some of the thoughts that came up in discussion:
1. One of John’s biggest concerns with having three children was the fear that one would often end up being left out. As one of three ourselves, we both experienced this firsthand: in my family, my younger sister was definitely the odd gal out growing up (though happily, not anymore), and in John’s family, he was so much younger (and the only boy) that his older sisters naturally paired off (though also adore/d him!).
Though I agree that someone being left out at some point is inevitable, I also made the case that with the birth order we’ve already established, it will hopefully be less of an issue either way. If we were to have another boy, yes, the boys would pair off sometimes, but we could compensate with extra-special Mama time for June, as the oldest (and since we joke that she’s already a 5-year-old in a 36-year-old’s body, it’s probably what she’d prefer, ha!). If we were to have another girl, then there wouldn’t be as natural of a pairing, and would likely see more mixing and matching: sometimes the younger two might pair up, sometimes the older two, and sometimes the girls.
2. Girl clothing is WITHOUT A DOUBT more fun than boy clothing, and the idea of getting to re-air favorites from June’s wardrobe was thrilling. Either way, we’ll be well-stocked for clothes: I have plenty of favorites from both kids tucked away in our attic.
3. The biggest and most pressing reason that I was rooting for a girl: for several years, we’ve had a girl name locked and loaded… and ABSOLUTELY ZERO idea what we’d name a boy. Like, NO strong contenders whatsoever. (Whereas, for a girl, I had plenty of back-up options waiting in the wings, even though we already had a frontrunner!) Not only did I love and want to use the girl name we had picked out, but I was not looking forward to 20 weeks of wracking our brains for an acceptable boy name…
…which is why I’m very happy to share that our next few months can be spent window shopping for bows and dresses and floral sheets instead of poring over baby name databases! Yes, we are adding another little girl to our family!! We couldn’t be more excited and love talking about baby sister – she already seems like part of the family :)
I’d love to hear: if you have siblings, what’s something your parents did to encourage a close bond growing up? (Or, maybe you have older kids and something to share that has worked well so far!)
One thing that my parents did not do, that I’m experimenting with (inspired by NurtureShock, one of my favorite parenting books): reminding our kids that they are best friends and always will be (speaking it into being, ha!). I also try to verbally affirm that they are being “good friends” to each other when they do something kind, play nicely together, or are enjoying each other’s company. It’s been a few years since I read the book, so I’m a little fuzzy on the details, but I believe this suggestion came from the sibling rivalry chapter, and the idea that we have a lot more conditioning around friendship and how we treat friends. If we can translate some of that to siblings, it can be a great start! Would love to hear your experiences! :)
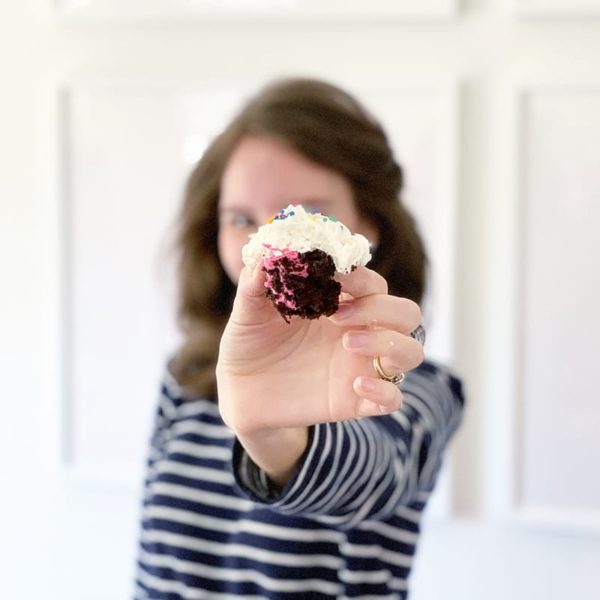
P.S. We asked the ultrasound tech to put the news in an envelope, then opened it on a Zoom call with both of our families – so fun! June was very set on biting into a cupcake to find out the news (after hearing about it from her cousins), so that’s what we did. You can see that our families were pretty evenly split on their final guesses, though interestingly, both John and I and both of the kids picked girl in the end!
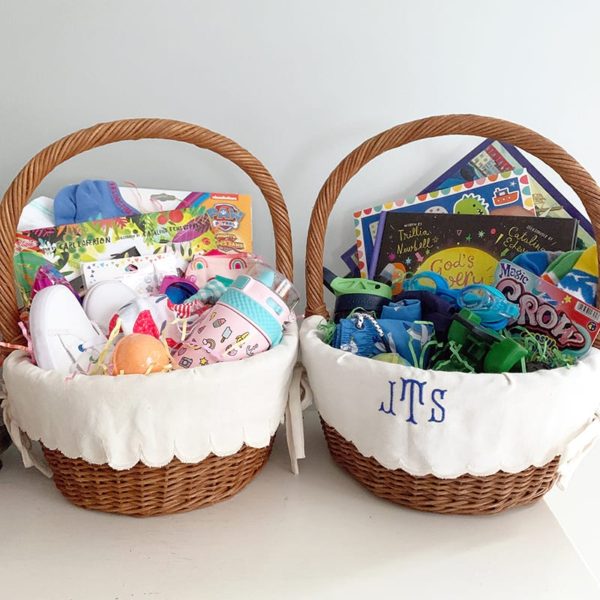
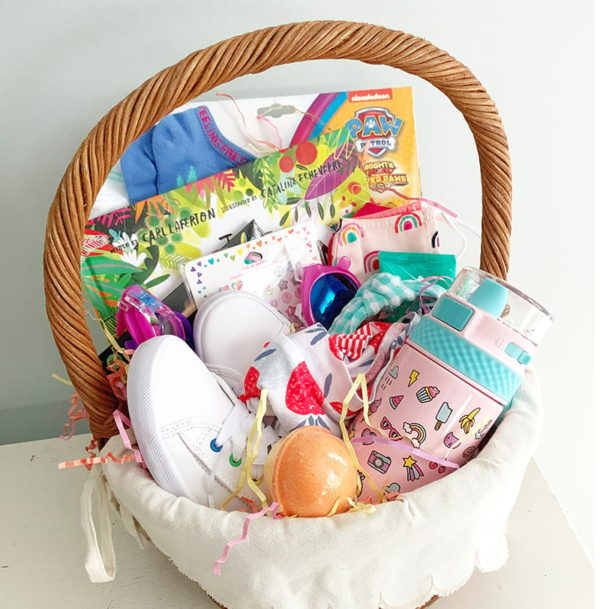
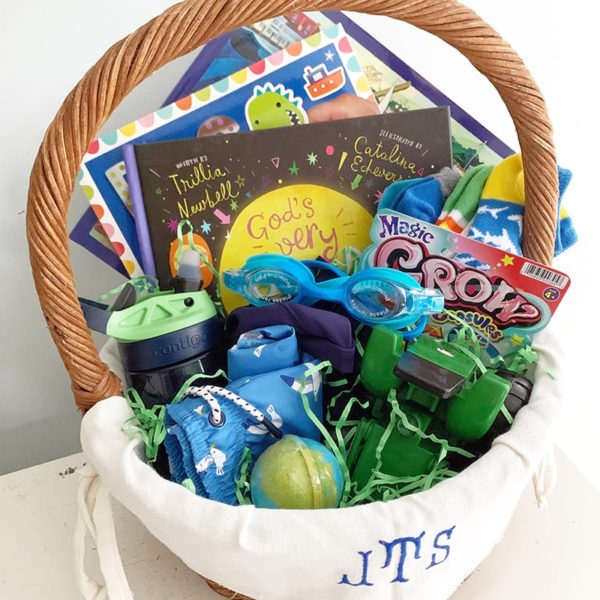
Filling Easter baskets for our kiddos has become one of my favorite springtime traditions! As someone who didn’t grow up with them, I’ve really grown to love the opportunity they give me to highlight an important holiday in our faith, support small businesses, replenish basics at the turn of the season, and create some magic for my little ones. And personally, as a creative person, they’re just really fun for me to collect, curate, arrange, and fluff!
This year, we’re doing Palm Sunday baskets as opposed to Easter baskets. I agonized over this decision, but so many of the items I’m including will be used on spring break, and our break falls before Easter. It didn’t make sense to withhold the items I’d planned to include and buy extra things simply to fill their baskets. Plus, these baskets will double as road trip goodies – which is why they’re a little more stuffed than usual!
(If you’re curious, I’ve written extensively on my feelings about Easter baskets in the past – this post from last year captures why I love them and feel they’re an important part of our faith tradition! This post covers some of my tips for keeping baskets budget-friendly.)
Onto the stuffing! Before I get into the 2021 specifics, here are a few things I consider including each year:
— Pajamas. These usually come from Hanna Andersson or my favorite consignment sale (which sadly has been canceled three times in a row now due to COVID, sob!).
Knowing that not everyone chooses Easter baskets as their big parenting moment (ha!), I would love to hear something you are “extra” about celebrating! (Or that was celebrated big in your family growing up!) The less traditional or expected, the better. The first day of school? The first day of summer? The tooth fairy? Tell us below!