9 April 2009
I love finding new sources for inspiration, and last weekend I was lucky enough to stumble upon Napa Valley Celebrations, an event planning company out of California. Their website is fabulous! I couldn’t resist sharing one of the featured events with you, but definitely check out their galleries yourself. Believe it or not, what I’m about to show you is a rehearsal dinner. It’s chic and stylish, and so many of the elements could be put to use for a wedding, engagement celebration, or summer cocktail party. I have a feeling you’ll love it as much as I did.

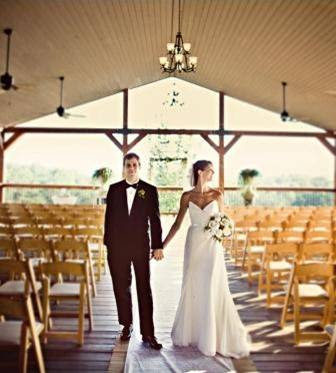
Porsche & Larry hosted their rehearsal dinner at a private winery and gardens.


The tables were dressed in grayish-greenish linens and set off with chiavari chairs topped with plum cushions. Plum napkins added a pop on top of the tables.

Even though this is an uber-luxurious celebration, there are style clues that could easily be translated to a lower-budget affair, like using a mix of square, rectangle, and round tables to create an interesting visual setup.

I think the florals are my favorite part of this party’s style, and though gorgeous, they, too, could be a DIY project. The above arrangement, for example, is mostly variagated leaves and berry brambles {love!} with a few roses tucked in for variety. Footed cut glass compotes could be gathered at garage sales and flea markets in the months before the party.

These, too, could be done on a budget – buy some tall glass cylinder vases at Ikea and some greenery at a flower market {if you’re lucky enough to have one nearby} or from your florist, then arrange to your liking.

This escort card display is another possible DIY – stain a low, long box a dark color, fill with moss for a clean look, then use wooden skewers and small cards for guests’ names and table numbers.

Guests at Porsche & Larry’s celebration were treated to synchronized dinner service, fabulous wine {of course!}, and strolling flamenco guitarists throughout the night.

Another takeaway tip – stretch white twinkle lights across the seating area and set votives out along ledges or walkways to create instant ambience.
All photographs by the incredibly talented Meg Smith. To see more celebrations designed by Napa Valley Celebrations, check out their website here!
8 April 2009

Hello, friends! Guess what? DIY Wednesdays are back! This week, I’ll be showing you the lined envelopes and embellished cards I recently made for a friend’s birthday. Both are super easy and extremely satisfying projects.

Let’s gather our supplies first, shall we?
cutting mat
straight edge or ruler
pencil
thick cardstock
bone folder
adhesive (I used a Tombow permanent roller)
Martha Stewart edge punch, available at Michael’s (use a 40% off coupon!)
an envelope
patterned paper
coordinating thick stock cut to fit your envelope
x-acto knife
First, the cards, and really, they couldn’t be easier – but they look fabulous! {Psst… it’s all thanks to Martha!}

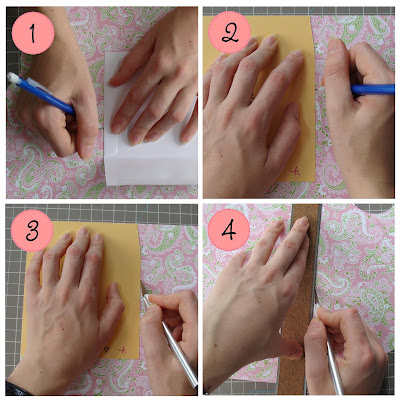
1. Cut your cardstock to fit your envelope if it doesn’t already. Make sure your card is at least a 1/2-inch narrower than your envelope for easy ins and outs.
2. Using a Martha Stewart punch, carefully punch out a design along the bottom. Three tips: a) flip the punch over so you can see where you’re cutting (as in above photo); b) if your paper is textured, cut with the textured side facing the top of the punch to avoid rough edges; and c) when moving along the paper, overlap the edge that’s already cut just a tiny but so your pattern is continuous (in the closeup photo above, the tiny overlap is on the left – see what I mean?).
Et voila! A custom card for pennies.

Now for the envelope half of the equation, which is only slightly more difficult.

1. Trace your envelope onto patterned paper. Measure the width of your lick-’em-stick-’em strip (at the top of your envelope). Mine was a 1/2 inch, so I trimmed off a 1/2 inch from the top and both sides. If the top of your envelope is angled, be careful to cut the angle exactly.
If you think there are more lined envelopes in your future, or you’re planning to make a set like mine, I would highly suggest making a template at this point. All you need to do is trace your envelope insert shape on to a thick piece of cardboard and cut it out – it will be much sturdier and last much longer than thin decorative paper.
2. Working with your template, trace it onto the paper you’d like to line your envelope with.
3 & 4) If you’re feeling brave, skip the tracing step and cut directly around the template with an x-acto knife. Otherwise, line a straight edge up with your tracings and slice away.

5) Ta-da! Now you’ve got a correctly-sized insert.
6) Insert it into your envelope.
7) Line your straight edge up with the crease in the envelope and imprint the crease on your liner with your bone folder. Fold the liner on the crease to make it even deeper.
8) Remove the liner from the envelope and glue along the edges, taking special care with the flap.

9) Carefully reinsert the liner into the envelope, making sure it is evenly spaced from each side.
10) Run your hands over the back of the envelope to smooth things down and secure the glue.
11) Fold the liner…
12) and then fold the flap down, running your hands over the flap to secure.


Done and done!
8 April 2009
Happy Tuesday, everyone! Today’s reader mail comes from Alyssa, who’s looking for simple sandals that can be worn when dressing up (a sundress) or down (jean shorts). She’s also on a budget.
My favorite way to bridge the occasion gap is by sticking to a classic base (in this case, leather), unfussy styles that look chic (whether expensive or cheap), and a touch of metallic (but make sure it only has a dull sheen to it). Here are some of my picks, from least expensive to most:


These Victoria’s Secret (!) classic flip flops come in a dull gold (left photo, top) and mocha (right photo, middle). Both would fit the bill and clock in at just $29.

These Colin Stuart classic thongs from VS look extremely comfortable and are also just $29. If Alyssa isn’t feeling the metallic, she could easily choose black or brown suede with these.

American Eagle adds a twist to their leather flip flops with (appropriately) the Twist sandal. $29.50, comes in a flat gold.

Lastly, for a silver option, we have J. Crew. Their leather Capri sandal is on sale for $39.50 and comes in the metallic silver above, as well as light gold and a “metallic guava.” Oolala.
I hope this helps, Alyssa! If anyone else has a fashion, wedding, decorating, entertaining, or organizing question they’d like answered on Peach & Pearl, shoot me an email: peachandpearl [at] ymail [dot] com. I’d be happy to see what I can find!
7 April 2009
As promised, I’m back this week with details on my dress for the black-tie ball I’m attending in May. I told you I was looking for a sophisticated, classic, and occasion-appropriate gown on a budget, and that I had a hard time fulfilling all three requirements.
I thought I’d begin this post the same way I began my search: with inspiration photos. Though I’m not planning to get married anytime soon, I do write about weddings on an {almost} daily basis, so I’m not ashamed to stay that I have quite the stock of favorite dresses squirreled away. The similarities between evening gowns and wedding dresses are obvious, so it only made sense to check my stash for recurring themes before I set out for the stores. Here are a few of my favorites:

I love the beautiful simplicity of this Lela Rose dress. The pleating is gorgeous and understated, while the deep v back adds just the right amount of drama. {via Style Me Pretty}

As you may know, I am a sucker for the sweetheart neckline. I think a mermaid or trumpet shape can look perfect when paired with the right body type. {photos by Lisa Lefkowitz}

What’s not to love? Gauzy, ephemeral tulle on the bottom paired with a crisp structured top – exquisite in my book, though perhaps not the look I’m going for in an evening gown. {via Southern Weddings; photos by Jessica Claire}

Simple and classic is definitely what I am drawn to most often, and this dress, paired with a single strand of pearls, fits the bill. {via Style Me Pretty; photo by Casey Cunningham}

Are you beginning to see a pattern emerge? {via Snippet & Ink}

Another sweetheart neckline paired with soft draping – picture this dress in black and you pretty much had what I set out to find. {via Southern Weddings}
So now you know what I was looking for – but did I find it? I looked online at Nordstroms, Nicole Miller, Cache, Bluefly, and E-Dress Me, but was having a hard time pulling the trigger without seeing the dresses in person. It was mostly a moot point, however, because nothing really caught my eye.
Last weekend I ventured into Boston with a few friends hoping to score a deal at Filene’s Basement, the famous location of the Running of the Brides. Unfortunately, I forgot that their larger, Downtown Crossing location is currently closed for renovations, and the Back Bay location we went to had a VERY scanty selection – we didn’t see anything we were even interested in trying on.
From there, we crossed the Common to wander down Newbury Street. We knew going in that most of the dresses would be far beyond our budgets, but {in light of the current economic situation} were hoping there might be some sales to be had. Unfortunately, we were disappointed, though I was eyed this beautiful Nicole Miller dress that Miss Cowboy Boot recently tried on:


Discouraged, we headed to Macy’s for our final stop of the day. At this point I was pretty desperate, and grabbed every dress in my size that looked halfway decent off the racks. The first dress I tried on? SO not my style… but you know where this is going.
Yep, that’s the one I bought. And no, I don’t have a photo for you. {Sorry!} I’ll try to help you put it together in your head, though. Here we go: take the deep V back of the first dress. Add the trumpet silhouette of the second dress. Add the neckline of the fourth dress. Add some ruching down the front. Put it all together, then put it in a deep royal blue sateen – and that’s my dress! You’ll have to wait until May to see the real thing.
Alright, we’ve covered the location and the dress. What do you want to hear about next – hair or jewelry? Or are you finding this series totally boring? Let me know in the comments!
Previously:
Rosecliff: The Location


