It seems like everyone’s growing something this year, doesn’t it? I love it! I’ve been comparing garden notes with friends just as often as I’ve been swapping recipes and kiddo activities lately, and it feels springy and hopeful. So, let’s dish the dirt today, friends! :)
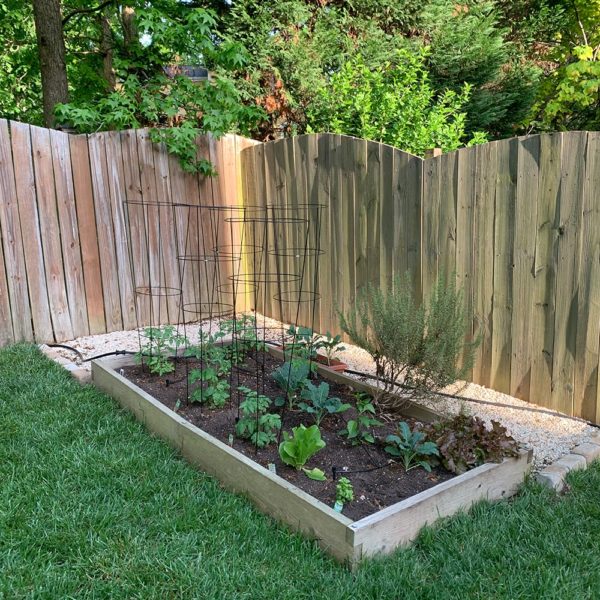
Our primary growing spot is our 4×8 garden bed in our backyard, carefully positioned to take advantage of as much sun as possible. John installed it in this spot the month after we moved in, and a few years ago we replaced our original raised bed kit with one from this Etsy shop, which we LOVE – super high quality, lovely details, and easy to install. The boards are really thick and it feels like it will last a long time.
Though we’ve experimented with a bunch of different vegetables over the years, we’ve settled into a consistent rotation that reflects what we like to eat and prioritizes produce that is expensive and/or tastes noticeably better when grown at home. For us, that mostly means tomatoes and herbs.
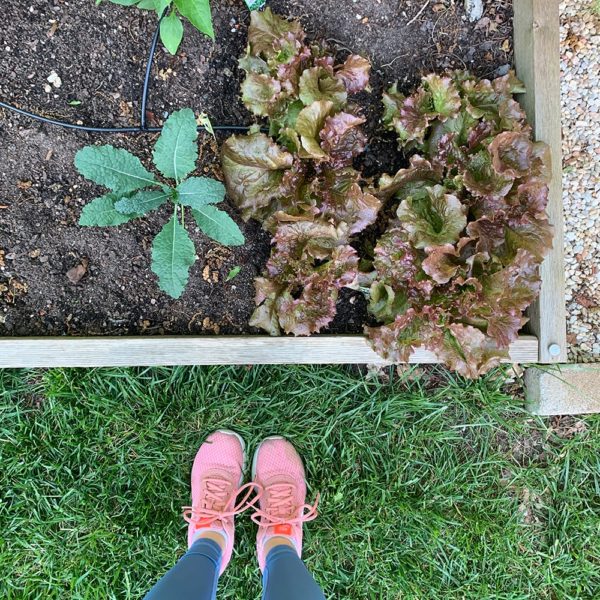
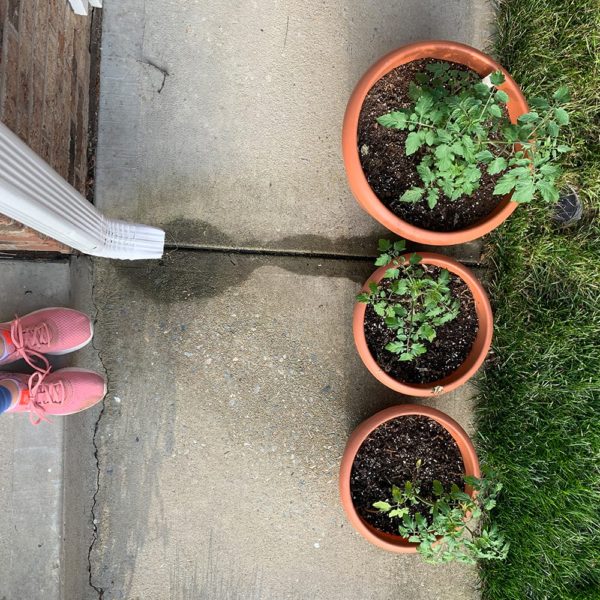
This year, we’re growing eight tomato plants: three cherry varieties (Sun Gold, Husky Red, and Super Sweet 100) and two medium varieties (Patio and Better Boy). We’ve found we don’t get enough sun for the bigger guys, so we stick to our sweet spot! We’re also growing basil, rosemary, jalapeno, Lacinato kale (for our beloved chickpea pasta), blueberries, and a few different kinds of lettuces.
Elsewhere in our yard, we have jasmine, coneflowers, lantana, scabiosa, heliopsis, Knockout roses, daisies, azaleas, hydrangeas, gardenias, and our beautiful Golden Celebration garden rose, among a few other things.
If we were to have more room some day, I’d love to grow peas, more berries, more tomatoes, cucumbers, bell peppers, and zucchini – as well as many more flowers (zinnias, cosmos, dahlias, peonies, clematis, sunflowers, more roses, lilacs!).
One tip: though we enjoy watering with the kids almost daily, John installed drip lines last year, and it made a HUGE difference in the productivity of our plants, especially with our summer travels. The lines are not that expensive and take a half hour or so to set up. Totally worth it, in our opinion! We bought this kit, which was plenty for our 4×8 bed, and this hose timer.
Now, friends, I’d love to hear: what are you growing this year? Or, if you haven’t had a chance to get plants in the ground yet, what do you dream of growing in the future?
Hello, friends! How are you feeling? We are fine – mostly staying home, playing outside in our neighborhood or going for a hike, and taking the whole idea of working-remotely-with-kids one day at a time. This weekend, I worked on a few projects around our home: tidying corners where clutter had built up, sorting out spring clothes for both kiddos, and continuing to work on our loft. We’ve also FaceTimed family, worked on the invite for my meal-planning potluck (something to look forward to many weeks from now!), read more than usual, and watched Bridge of Spies. Thinking of getting a puzzle next :)
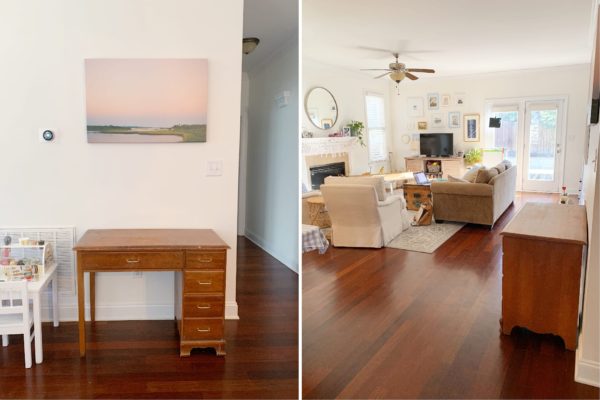
Ready for a little distraction? This post seems particularly appropriate for the times we’re in. It’s a project you can do at home, that makes the home you’ll be spending a lot of time in more lovely! Today, I’m sharing the full process of rehabbing my desk with chalk paint (some of you may have seen peeks on Instagram already!). I hope it’s helpful, especially if you’ve considered a similar project but felt intimidated, like I did.
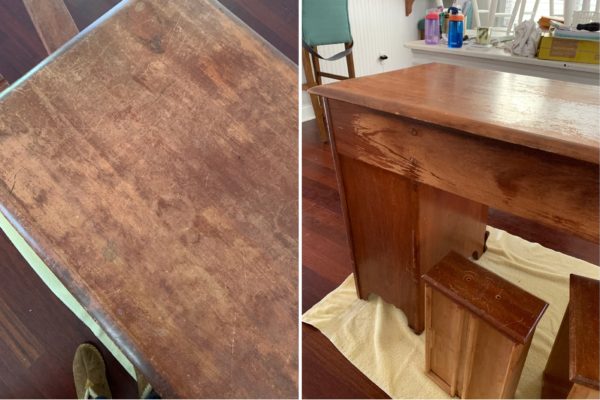
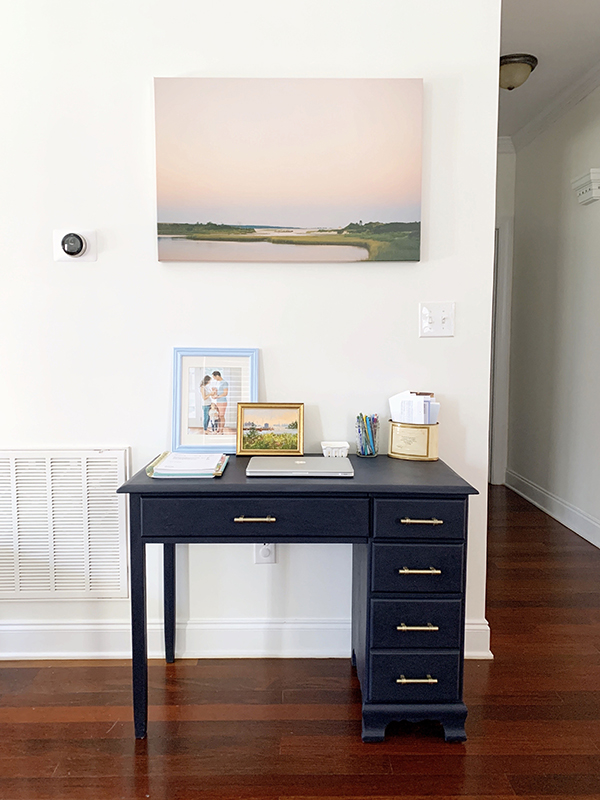
Here’s the before. This desk was in my childhood bedroom (and my Dad’s childhood home before that!), so it’s been around the block. For most of its North Carolina life it’s lived upstairs in our loft, but in a game of furniture musical chairs it was moved downstairs in the hopes that it could become something of a command center and work-from-home spot for me.
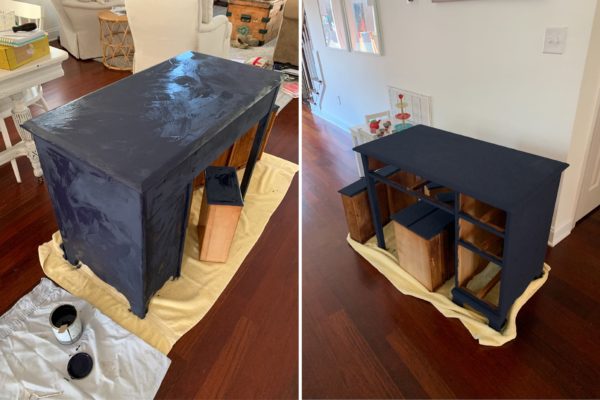
Once we decided we liked it in that spot (yay!), I considered my painting options. I had already decided to try Annie Sloan Chalk Paint – which, despite the name, is not chalkboard paint but a unique finish that can paint over existing surfaces (including stains) without any prep work.
Annie’s paint has a more limited palette, so I quickly narrowed my choices down to Louis Blue (a gray-blue) and Oxford Navy (a dark navy). Instagram was split when I polled, but in the end I thought navy was the more fail-proof, classic choice (and nicely picked up some of the navy tones in our gallery wall).
Though I may appear it from the outside, I actually don’t consider myself a particularly crafty person, and I was nervous to dive into this project – it seemed like there was no going back once I put brush to desk! I did ask my local retailer a few questions before getting started, and I also watched one of Annie’s beginner videos online, which was confidence-building :)
Of course, as soon as I splashed on the first brush stroke, I immediately said to John, “this was a great idea,” ha! The vibrant paint reminded me that the desk, while serviceable, was actually not in very good condition and didn’t have much to recommend it in terms of finish. It was scratched, stained, written on, and faded, as you can see:
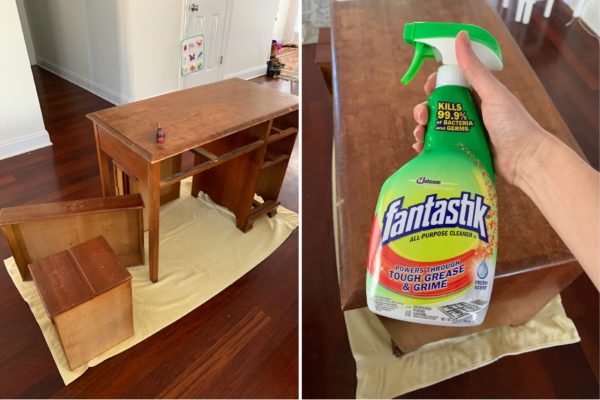
But let’s back up. The first step was to take everything out of the drawers, remove the hardware, and wipe everything down (my paint retailer recommended Fantastik). The neat thing about chalk paint is that it has zero odor, so it’s safe and palatable to do this project indoors!
Next, I brushed on the first coat of paint. You can buy a (very expensive) Annie Sloan brush, but I just used my preferred wall painting brush, one with a short handle like this. The paint washed out of it easily with soap and water. Per Annie’s advice, I splashed the paint on liberally and casually, brushing a fairly thick coat in all directions (but trying to smooth away globs when I saw them). Here’s what it looked like immediately after two coats, and the next morning:
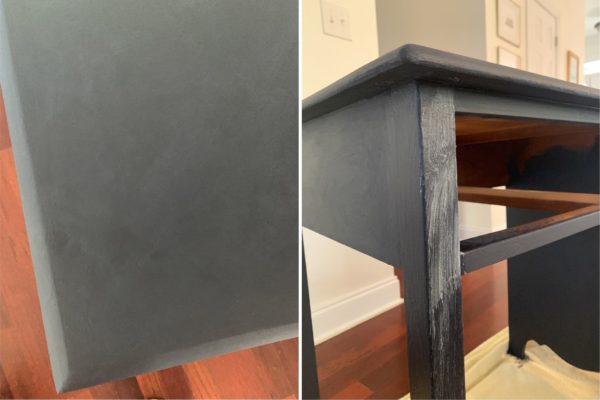
A few days later, I added the wax layer. (A tricky part: you have to make sure that you do NOT touch the piece before you apply the wax – even minor touches show up as white scuffs.) To apply the wax, I used a cheap wooden brush. I found it hard to get the wax out of the bristles, so I just used two (they’re like fifty cents) and threw them away after use.
Disclaimer: this was my first chalk paint project, and I’m still not exactly sure I did the wax layer 100% correctly, ha! They say to use a “lint-free cloth” to buff it in, which does seem to be important because the first cloth I used shed some fibers. I switched to an old pillow case we’d cut up as a rag, and that seemed to work fine. (I threw away the pieces I used after each layer here, too.) As opposed to the paint, the wax was a bit stinky.
I rubbed in the two layers of wax a few days apart. I considered doing a third on the top just to give it additional layer of “hardness,” but the paint retailer shared that I likely wouldn’t get any further protection, because each layer of wax kind of melts the layer underneath it. Here’s a snap of the desk before the wax went on, and then the amount of wax I applied before rubbing it in:
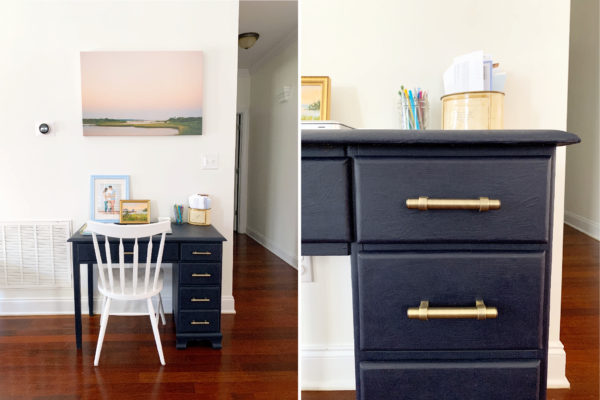
Any chalk paint experts want to tell me if I was using the right amount of wax? :) After both coats were applied, I waited the full two weeks to reassemble the desk and place things on top, which allowed the finish to harden. In the meantime, I ordered this more subtle brushed hardware, and I really like how it looks with the piece!
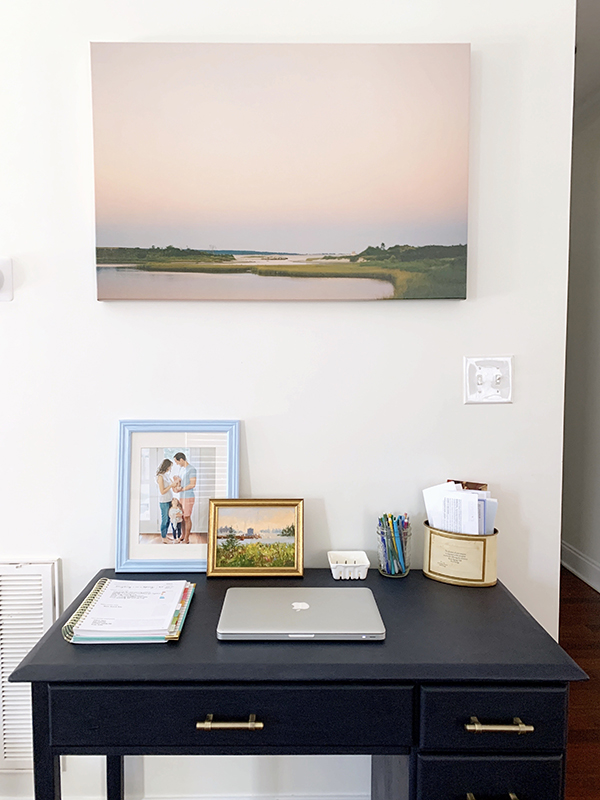
I’ve used the desk for a few weeks now, and I’m happy to say the finish holds up really well – no scuff marks or dings or anything like that. I think chalk paint was a great choice for this piece and I’d definitely use it again! Here’s my breakdown of the pros and cons of chalk paint, and a few photos of the finished look.
Pros: — Easy to use, despite my initial hesitations. — A more limited palette of colors to choose from, which helps with paint chip paralysis. — The painting technique itself is freeing and fun! It doesn’t really seem like you can do it wrong. — You don’t have to do ANY sort of surface prep, which majorly cuts down on time and effort for an older piece. — It’s odorless, so you can paint indoors. — Seems to be good quality and hold up well, at least so far.
Cons: — The paint is more expensive than normal wall paint, plus you have to buy the wax, too. — The paint colors are limited. — The finish is not smooth – it has a texture to it. I don’t mind it, but it wouldn’t be right for all projects. — It seems to attract lint and fuzz, or at least, it seems to show up more to the eye. This might be because I chose a dark color!
So far, I’ve just pulled up one of our dining room chairs whenever I’ve wanted to sit at the desk. I’m considering tucking a little stool underneath instead, but this has been working great so far!
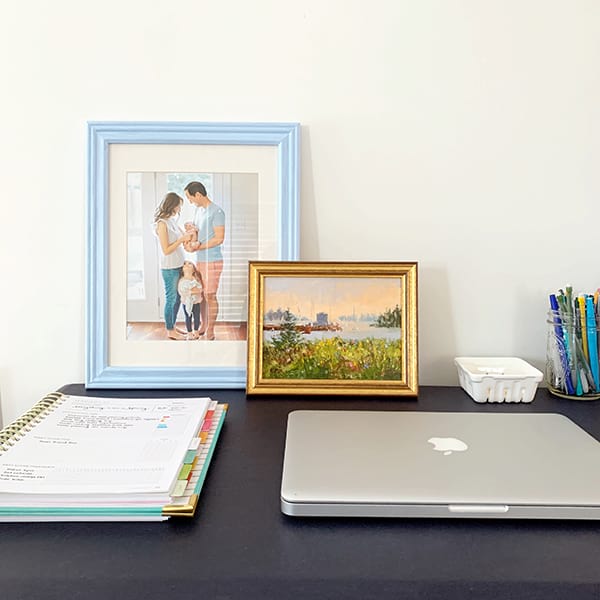
Curious what I’ve stashed in the drawers? The wide one has post-it notes, notebooks, notepads, notes and samples for work, tape, and a stapler. The top drawer has washi tape and sticker books. The middle drawer holds cards, postage, our address stamp, and my perpetual birthday calendar. The bottom drawer holds my hard drive, larger envelopes, my label maker, a crossword puzzle book, and various other supplies. On top, I have my favorite pens, my PowerSheets, and my laptop, and in the tin, I keep coupons and paperwork that needs action.
It has been exactly the little command center I needed and I’m so happy to have this stuff right where it’s most useful!
I’d love to hear: have you ever used chalk paint? Do you have a piece you’d try it on? Do you have a command center, and if so, what to you do/keep there?
After staying in two different homes over the holidays (and doing a little cooking in each), I came home to our kitchen with a new appreciation for some of our everyday tools (and a few items to add to our wish list that I loved using as a visitor!). Since we cook at home at least six dinners a week, I thought it might be fun to share some of our most-loved and most-used kitchen work horses. Whether you’re adding items to your wedding registry, building up your own mealtime arsenal, or looking for an idea for the next time your mother-in-law asks you for a gift idea, I hope this is helpful!
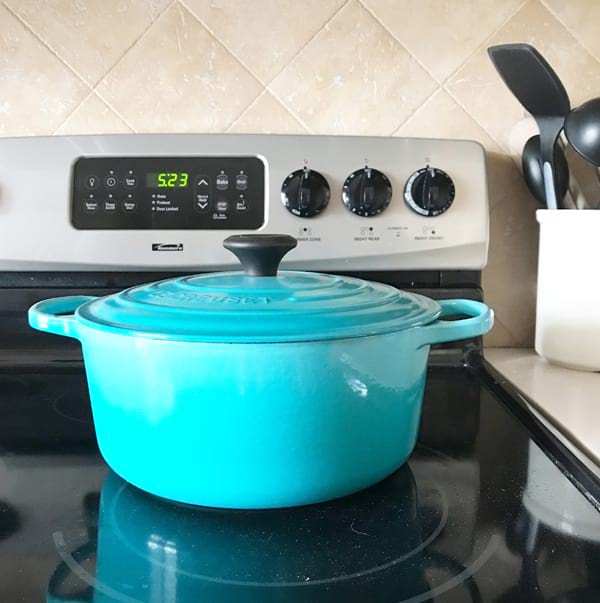
I’ve already waxed poetic about our Le Creuset dutch ovens (and the funny story of how we bought our first one), but they easily deserve the first spot on this list. We have a round 5 1/2 quart (my favorite) and a shallow round 3 1/2 quart. We use the biggie for making soups, stews, pastas, braised meats, risotto, orzo, and much more. I probably cook with it 5/7 nights a week. It goes from stovetop to oven to table beautifully, and is so easy to clean. Pick a color you love, because you’ll have it forever :)
Speaking of easy-to-clean: one of my favorite Shark Tank discoveries is the Scrub Daddy. His smile accurately expresses how easy he makes dishwashing!
We registered for a Calphalon cookware set and use many of the pieces daily (particularly the small and medium sauce pans and the stock pot). These are also easy to clean, which I love, but my favorite feature might be the glass tops, which makes it easy to see what’s bubbling at a glance! Our set is very similar to this one except ours are silver, not black.
More registry big dogs: our KitchenAid mixer (ours is black) and our food processor. The food processor got daily use in our seasons of making purees, but even now it earns its spot for making salsa, tikka paste, and just generally chopping stuff.
We don’t have a huge collection of one-off tools, but there are two that I’d recommend: an immersion blender and a griddler. We use the immersion blender for soups often (plus the mini chopper it comes with is really useful, too!). The griddler is great for grilled cheese, pancakes, and quesadillas in a pinch. The plates go in the dishwasher, which, if you can’t already tell, is an important attribute in our home.
I don’t have a ton to say about knives except that you should have them and keep them sharp :) I would recommend specializing with a great bread knife, and we love these little paring knives, too. This is the best peeler.
Now for a few things that I have no brand loyalty to, but would recommend saving a spot for in your kitchen: a blender, crockpot, simple wooden spoons, a citrus reamer, a big (for pasta) and little (for berries) strainer, a set of nesting mixing bowls (ours are very similar to this), mini silicone spatulas, several plastic cutting boards, and a slim plastic slotted spoon (I don’t love the bulky ones).
Finally, two things I’d like to add to our mix: a compost bin (this one is in my cart) and a lovelier dish rack.
TL;DR: I really, really love our Le Creuset.
I’d love to hear: what’s your number one kitchen item? Everyone’s cooking patterns and favorite recipes are so different, and I’m curious to hear!
One of my 2019 goals was to complete our family room – updating the aesthetic and making it function better for our family. We’ve been chipping away at it little by little all year, and I’m happy to say it is just about done!
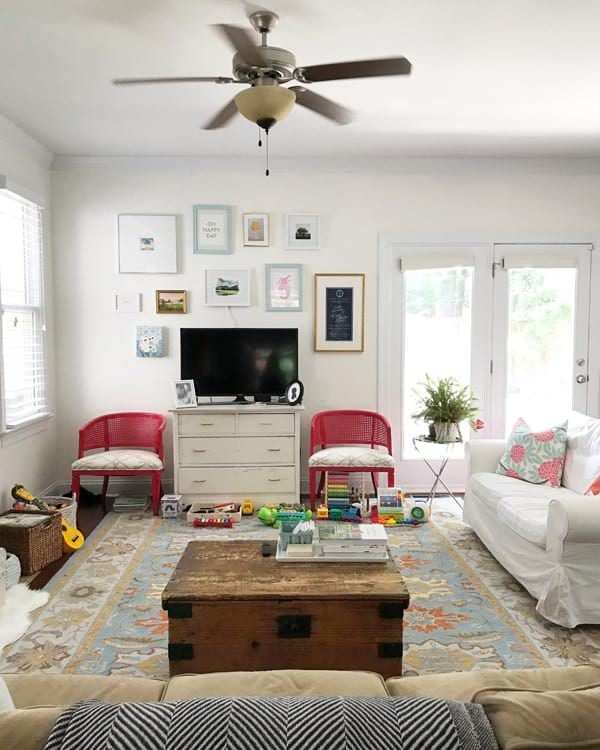
Our family room is the main play space for our kiddos, and a big part of this goal was finding a better storage solution for their toys. Previously, the toys had been just kind of lined up around the edge of the rug. It was fine, but visually cluttered, and hard for June to put anything away because there really wasn’t an “away.” The before:
A new storage piece was in order. I searched for months and continually came up short (everything was so expensive!). Then, late last year, I spotted the piece below at HomeGoods:
I snapped it up right away. I thought you might like to see how we use it, especially if you, also, don’t have a dedicated play room!
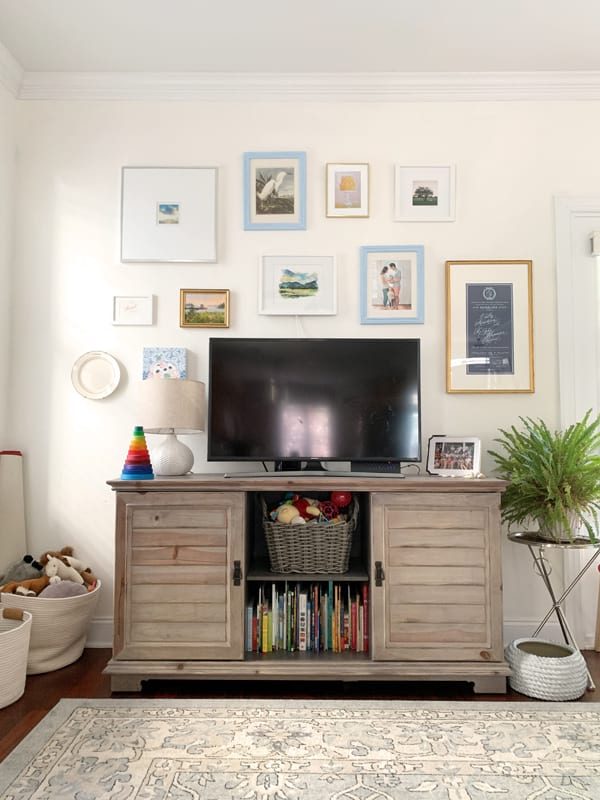
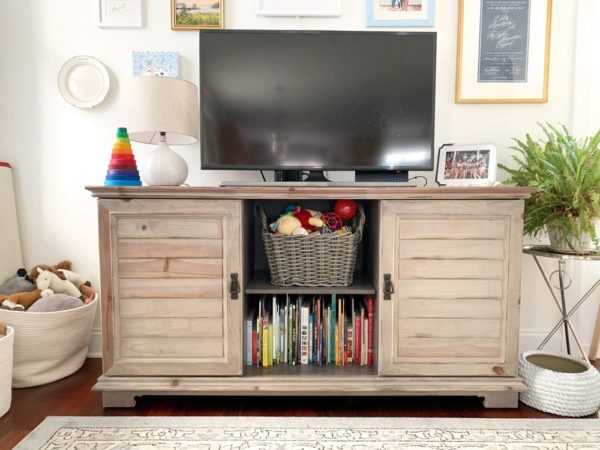
This piece stood out to me because it was mostly closed storage, and I wanted the least amount of fuss – a system that looked good on the outside and was easy for our kids to maintain. (This is why I wanted doors, not drawers – it can be hard for a three-year-old to open and close drawers herself!)
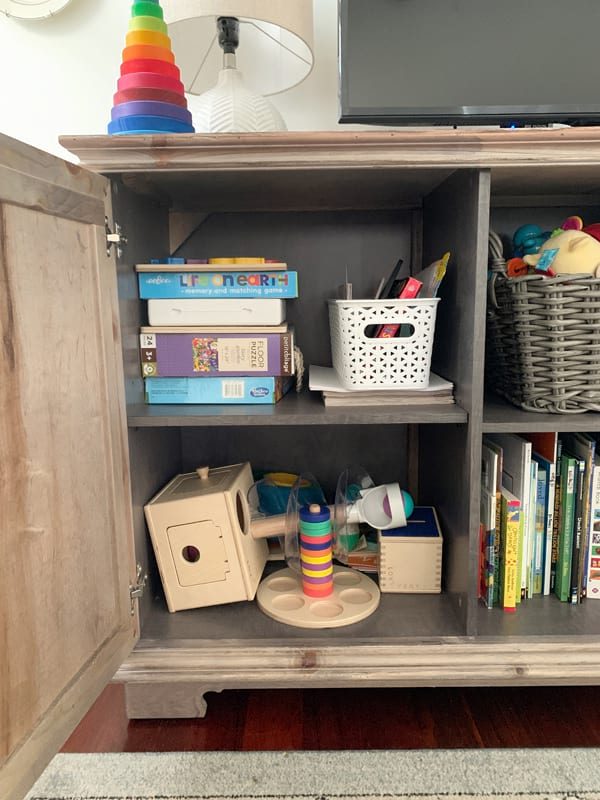
On the inside, you’ll see everything has a general “spot,” but things are not “just so” – and that’s great with me!
For example, here’s the lefthand side. On the top left is a stack of our current rotation of puzzles and games, including some chunky puzzles for Shep, June’s Lite Brite, and her favorite matching game. Next to that is a stack of coloring books and loose-leaf paper, with a little caddy of stickers, tape, scissors, a magnetic pad, and other art supplies (markers and crayons are in a bucket on the coffee table).
In the bottom cubby is the Babbler play kit from Lovevery Baby. John’s sisters got it for Shep for his first birthday, and it has been a BIG hit! The toys are Montessori-based, great quality, and perfectly tuned to his developmental age. SUCH a great gift!!
As you can see, everything is pretty loosely organized – but it’s also clear to June where everything lives, so she can easily help put things away.
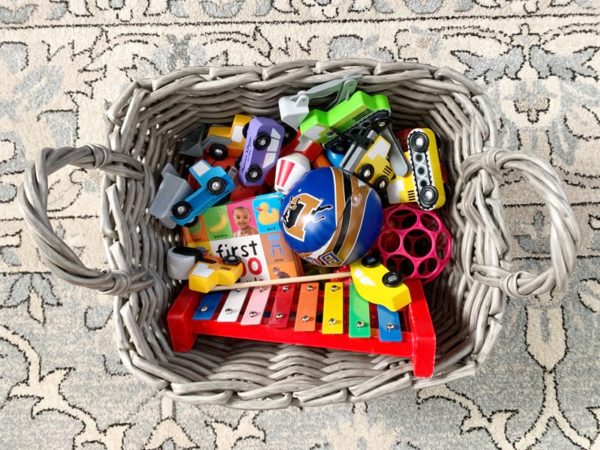
In the middle, we have a basket for Shep-specific toys – this was particularly great when he was really little, because I could easily pull it out and bring it to wherever we were doing tummy time. As I took these pictures, I stopped to switch out a bunch of the toys, since he’s not so little anymore! Current favorites include his xylophone and these cars.
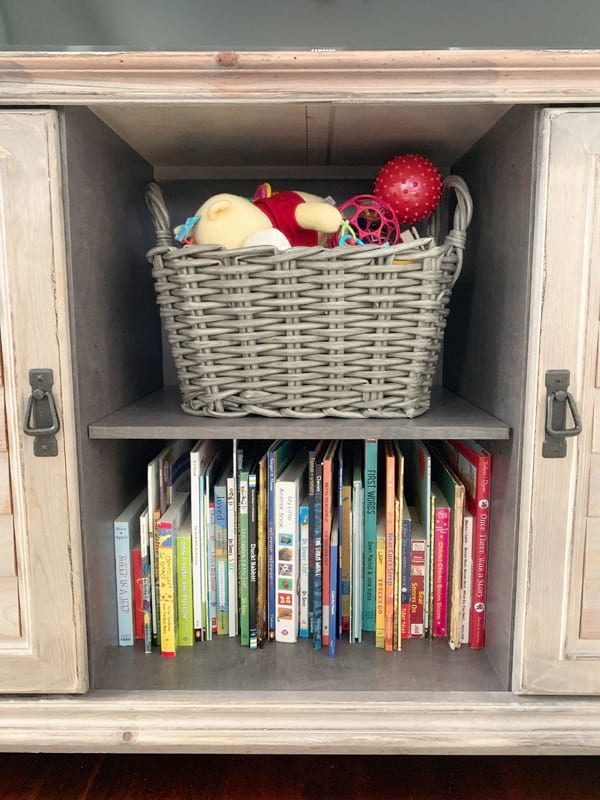
And of course, BOOKS! We have books throughout the house – in our bedroom, in their bedrooms, in the loft upstairs – but we keep a rotating selection of our favorites here.
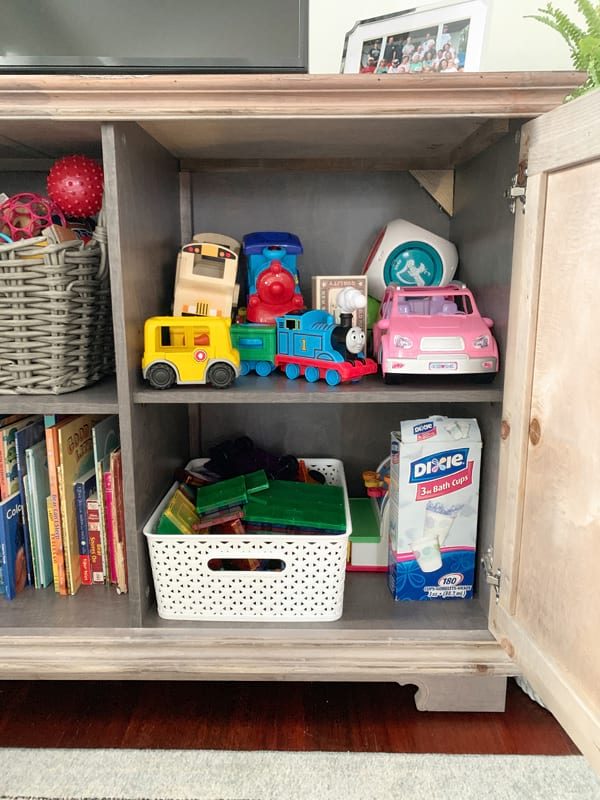
On the top right, we have general storage for cars, trains, and bulkier toys, like the bus and music cube. Again, it doesn’t look the prettiest, but as these are taken out CONSTANTLY, it’s way more important that they can easily be put back than they look perfect behind closed doors!
On the bottom we have bathroom cups (they are a favorite!), a cash register, and the pride of every toy collection – a big basket of MagnaTiles. Yes, everything everyone says is true – these get played with pretty much daily and are just as fun for Shep to knock over as they are for June to build with. (We also have the less-expensive kind, and they are great, too!)
Off to the side, we have a basket for building toys – Legos, wooden blocks, etc. all jumbled together! (This drives my sister nuts, ha!) The other basket is for stuffed animals, and a car play mat is rolled up in the back.
And there you have it! We have toys and books elsewhere in our house, but this is the main stash. It’s a tightly-edited collection, and I continually rotate things in and out as they grow and their interests change. I hope this little peek behind closed doors has been helpful! :)
P.S. Two gals whose toy storage I was inspired by: Rhi and Valerie! Affiliate links are used in this post!