22 January 2014
The light fixtures in our house are perfectly serviceable, but they are also not exactly our style. I guess you could call them “builder fancy”? (The upgrade from builder basic achieved via faux wrought iron detailing.) We knew we wanted to switch out almost all of the downstairs fixtures eventually, but I wanted to move slowly because a) it’s an expensive undertaking and b) our downstairs is pretty much one big open room, so all of the fixtures have to work together. We do now have a rough plan, and so have proceeded with step one!
But first, here’s the before:
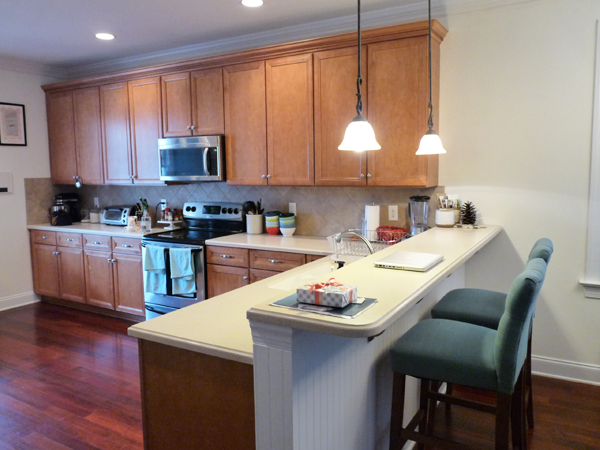

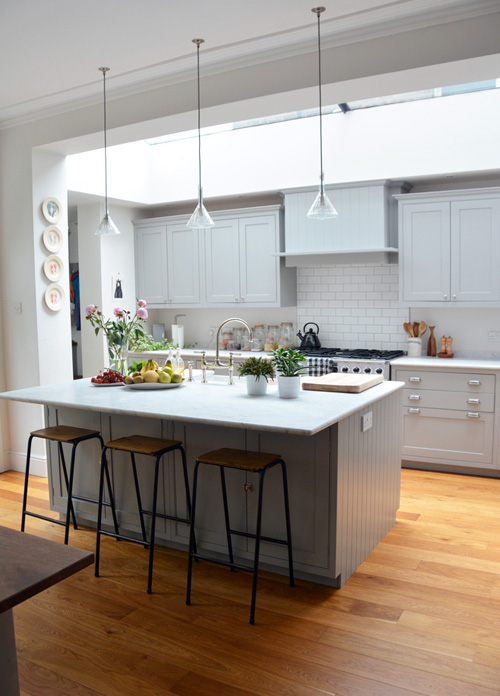
For the pendant lights over the breakfast bar, we wanted something bright and that took up very little visual real estate. The fixture over the dining room table is very close by and will eventually be a larger statement piece, so we didn’t want them to compete. I first came upon the idea of the glass funnel lights after seeing Courtney’s kitchen (which you know I love):

I like that they’re clean and modern but kind of classic at the same time. John was worried that they’d be too bright since they’re clear glass, but we decided that if we hung them a bit higher than eye level, we’d be okay. The lit-up example in the store helped convince us they wouldn’t be blinding, as well.
Once everyone was on board, we picked out these ones from Home Depot (the pewter finish, which is not available online), and waited patiently until we received them as a Christmas gift (thanks, Mom + Dad!!).
I was SO excited to see that Young House Love ended up using the exact same pendant in their kitchen! Even better, they posted a step by step tutorial for hanging, which was the main reason we didn’t electrocute ourselves during install.
I also found this example, which is just gorgeous:

Maine Home Design
And here’s our version!
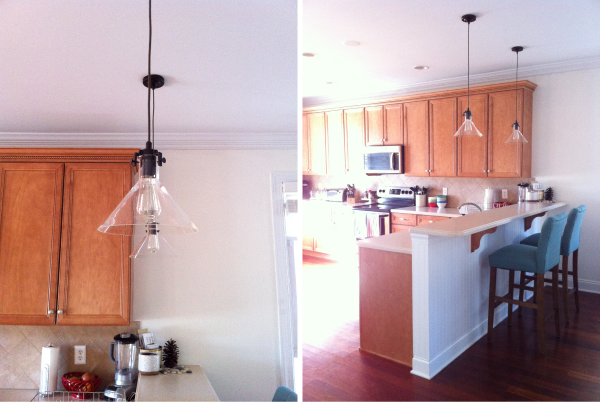
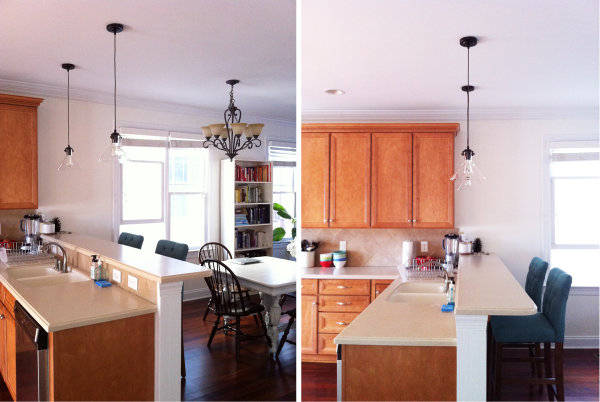
The chandelier you can see in the above photo will be next to go! We’re very happy with this light + bright change, and proud to have some electrical work under our belts! :)
6 November 2013
Wowee! Thanks for all your thoughts on our Christmas cards! I haven’t tallied up the opinions yet, but we appear to be almost evenly split between the five designs :)
In other news, you may recall that one of my September goals was to paint a chalkboard wall in our kitchen. John was actually not pleased when he saw this goal, because he was not yet on board with the idea of a chalkboard wall at all. However, we discussed, and realized that his hesitation was not about the wall itself, but about whether it would a) take a long time to execute and/or b) require his manual labor. Once I assured him that neither of those concerns were warranted, he was on board :)
I loved the idea of a chalkboard wall because I loved the idea of an easily-switched-out art installation in a casual part of our home. I wanted somewhere to practice my lettering, to record our weekly menu, to count down to exciting events, and to post a weekly scripture verse. The scripture verse has by far been the best part: it takes me so long to write them out that by the time I finish, I’ve memorized them. Committing favorite verses to memory has been something I aspired to but never made happen, so I’m especially thankful for this chalkboard by-product.
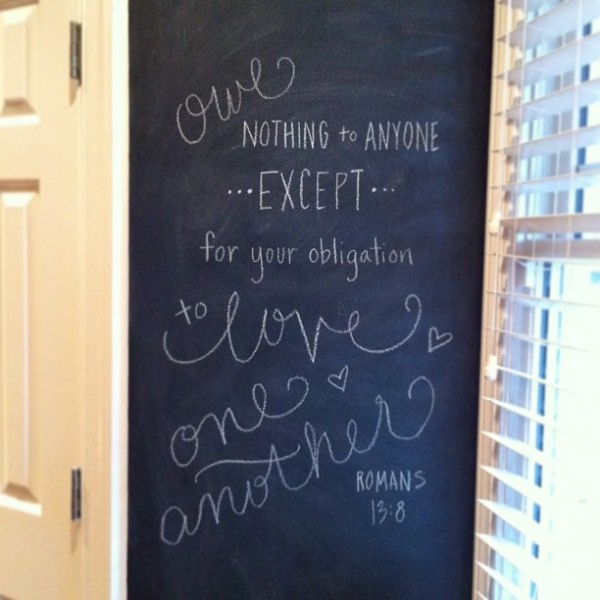
One of my favorites! A few thoughts for those of you looking to make your own:
— There are lots of Pinterest DIYs for mixing custom color chalkboard paint. I love these in some applications, but we decided to go with classic black and white.
— Choose your spot carefully. I knew I didn’t want a potentially messy-looking space where it would be part of a guest’s first impression (say, in our foyer), so the little sliver of wall between our kitchen windows and pantry was perfect.
— Be prepared to roll on lots of coats… and then a few more. I think I did five coats in the end. I used a mini foam roller and Valspar paint, both of which I would recommend.
Do y’all have a chalkboard wall? Any verses I should consider for our weekly installation? :) I’m looking forward to choosing favorite hymns/carols in December!
21 October 2013
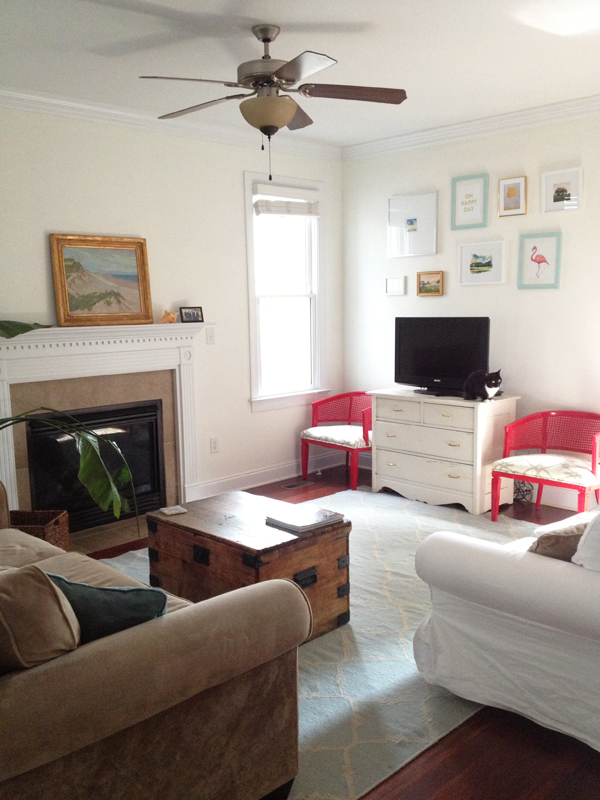
Hello, friends! Today I thought I’d share our gallery wall! I wrote about this project a bit here — thank you again for your comments!
Unlike the dining room table refinishing project, I felt good about just diving into this one! Based on my inspiration, I tried to stick to the pink, blue, and metallic families; made sure I had a mix of photographs, watercolors, oils, and more typographic designs; and incorporated a variety of frame and mat styles.
Here’s the before:
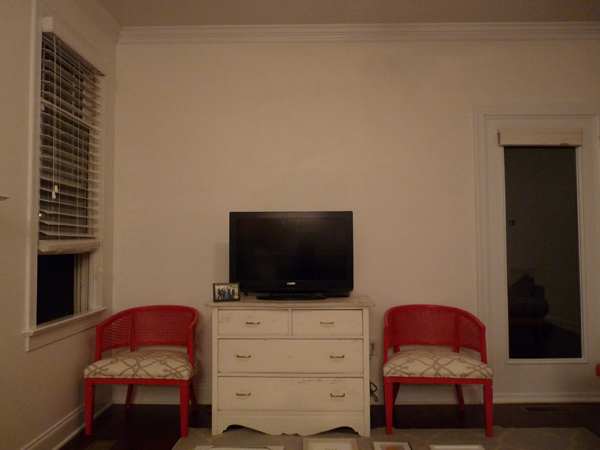
Yikes! I knew I wanted an arrangement that softly arched over the TV, so we started by playing around with all the pieces on the floor, right in front of the dresser. By doing it in front of the wall where it would hang, it was easy to approximate the space between each frame. Then, we just started at one end, and added pieces left to right, eyeballing as we went! Definitely a two-person job, so thanks to John for all of his help :) I’m not sure if this technique would work for everyone (I like to think one of my super powers is the ability to accurately eyeball whether something is even or level), but it worked great for us.*
Here’s what the space looks like now!
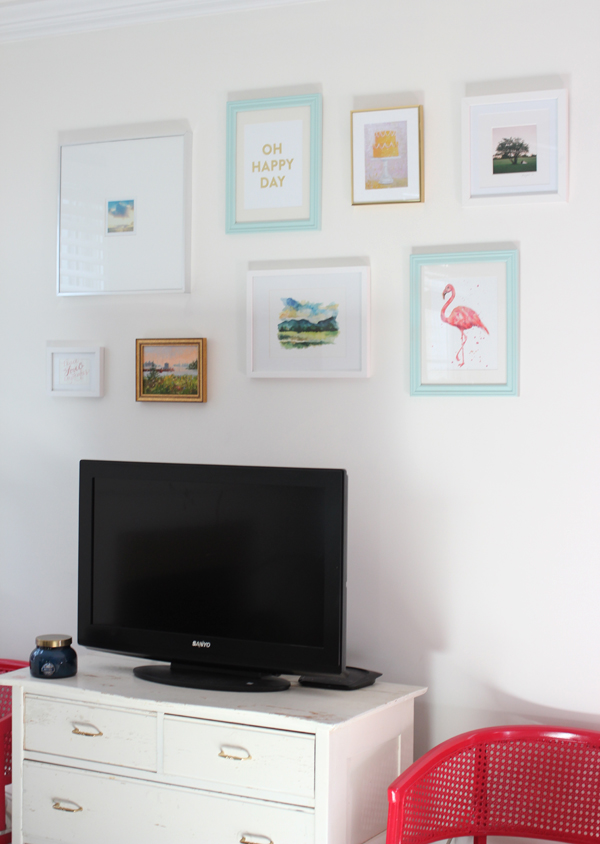
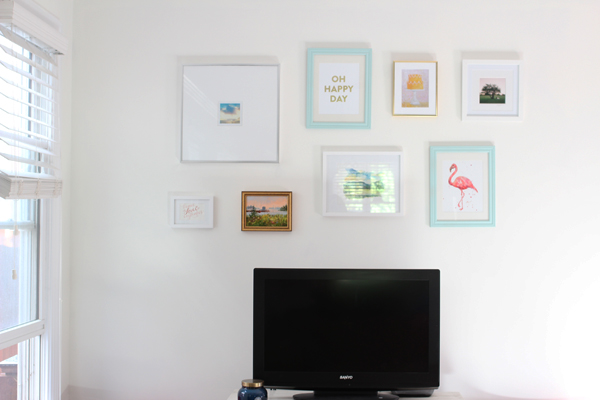
I would love to tell you a bit more about each piece, because they were selected with love! Apologies in advance for the photos — this project was so hard to photograph, with the glare on the glass and the shadows from the frames!
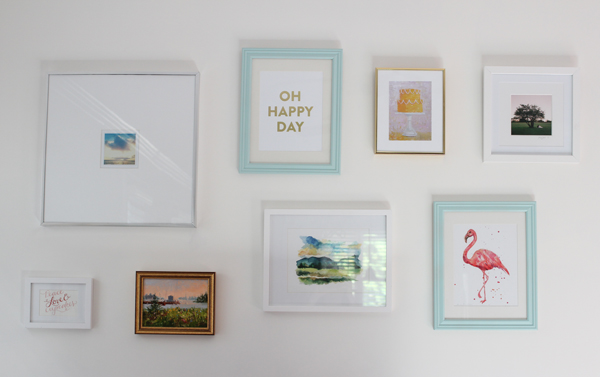
From left to right:
The “peace, love, and cupcakes” print is actually a card a friend sent to us (similar version here). The large square is an instagram sunrise from a trip to Florida. The little oil painting is a commissioned piece that was made for my grandmother many years ago. It’s of the view from her front porch in Maine. The Oh Happy Day print is available in the SW Shop! The watercolor of the Blue Mountains was a gift from my sister-in-law. The cake print is by Paul Ferney. The flamingo print was a wedding gift from two dear friends (available here). Last but not least, the photo was a gift from our wedding photographer, taken during our cocktail hour picnic.
Let’s talk about the frames for a minute. I was worried that they would add up quickly, but ended up being pleasantly surprised! Thankfully, several of them had already been collected prior to this project, so I only bought three new. Even so, the total cost was low: three were from Target, one from Michael’s, two from A.C. Moore (spray painted blue), and one from Goodwill.
To conclude, this project gets two thumbs up from me: it was fairly easy, fairly inexpensive, and added a welcome dose of color to our white walls. Can’t wait to hang the rest of the art in this room!
*If you’re looking for more exact instruction for hanging, Real Simple has some great advice on measurements and guidelines!
29 August 2013
We hung our gallery wall! Hooray! And we’re really pleased with how it turned out! But before I share it with you (though you’ll see a little peek here), I wanted to finish up another post that’s been sitting in draft for awhile.
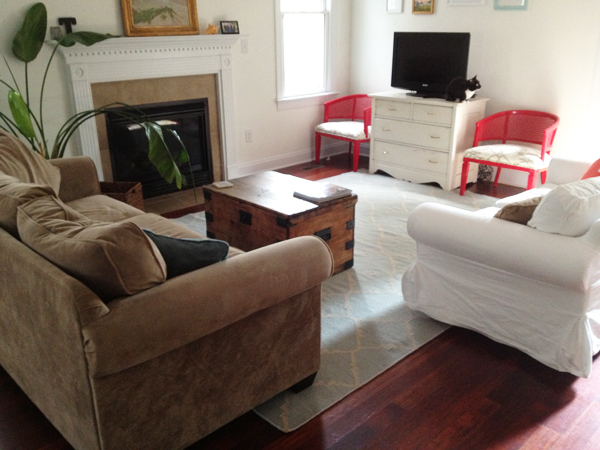
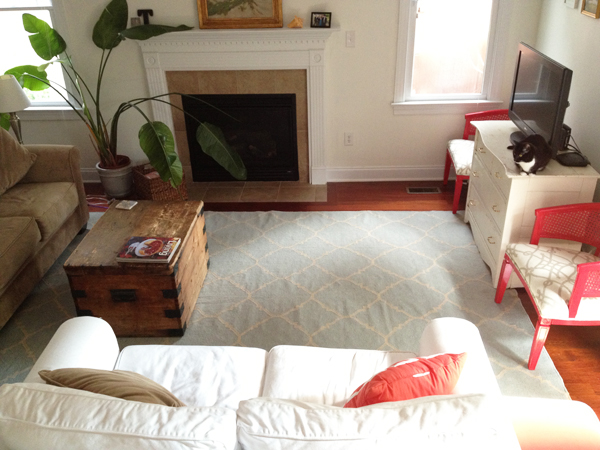
We decided when we moved in that we didn’t want to jump into any big purchasing or decorating decisions — especially expensive ones — immediately, as we thought it’d be wiser to live in the house for a bit and see how we naturally used the space. I’m glad we made this decision. Very quickly, however, it became apparent that our first big purchase would need to be a rug for the living room area. We love the wood floors throughout the downstairs, but without any soft surfaces of any kind underfoot, the overall effect was pretty cold. Plus, I don’t think our cats approved :) We also wanted a large area rug to anchor the seating area and set it apart from the adjacent dining area.
So, the search began! I virtually visited all the usual haunts, including Pottery Barn, Crate & Barrel, Wisteria, Serena & Lily, World Market, Restoration Hardware, Lulu & Georgia, Overstock, Rugs USA, Ikea, eSaleRugs, and Layla Grace. One tip: Make sure to look at the baby, child, or teen version of a store, if one exists (like PB Teen or RH Baby & Child) — they often have lovely, cheaper designs!
Complicating the search a bit was the fact that I was kind of shopping for two rugs, even though we only had plans to buy one at the time. We are probably going to buy a rug for under the dining room table at some point down the road, and because the spaces are so close, I want the rugs to work together well. As an aside, this issue has actually come up a lot as I think through choices for this space, from lighting to curtains — it’s really like decorating one giant room in three parts as opposed to one room or three distinct rooms.
We would eventually like some sort of vintage Turkish/Oriental rug (kind of like this) for under the dining room table (all of those colors will help hide spills!), so I honed in on something simpler for the living room. I tried to keep my mind open and my search wide, so we ended up with options in several of the colors in our palette — which, coincidentally, is pretty much the same palette as this blog. I know what I like. More on that later.
Here are just a few of the options we considered:
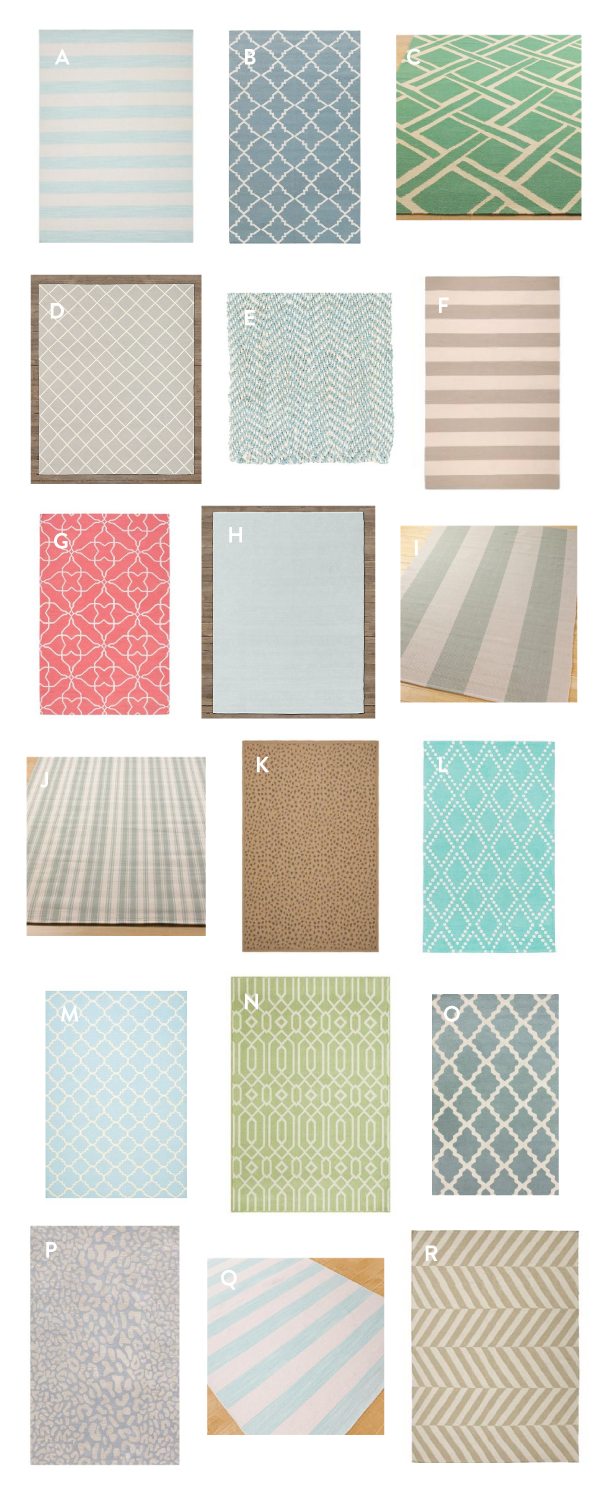
A. Overstock, B. Layla Grace, C. Shades of Light, D. RH Baby & Child, E. Shades of Light, F. Overstock, G. Layla Grace, H. RH Baby & Child, I. Shades of Light, J. Shades of Light, K. Rugs USA, L. PB Teen, M. Rugs USA, N. Overstock, O. Rugs USA, P. Rugs USA, Q. Shades of Light, R. Overstock
This was such a hard decision, friends!! If we hadn’t had a deadline (see below), I think we probably would have been hemming and hawing still. A rug is visually such a large part of a room, and such a large investment, that we wanted to get it 100% right. Yes, you can return a rug, but shipping can get very pricy, and you often have to pay a restocking fee. We spent our time on this decision not because we’re overly concerned with how our house looks (I don’t think), but because, as with every other purchase we make, we wanted to be sure we were spending our money wisely on something we would love for years to come. We are trying to be good stewards of what we’ve been given.
We finally decided on the Surya Frontier Pale Blue Hand Woven Wool rug from Layla Grace, and I’d say we got it 90% right.* I’m particularly proud of the price — we pounced on a 40% off sale over the Fourth of July, and got free shipping, too! Our 8×11 rug was less than $500. (Dina posted about purchasing a rug for 75% off from Rugs USA over July 4th, so I made sure to sign up for all possible store emails and be ready with our decision in advance! Highly recommended!)
Before:
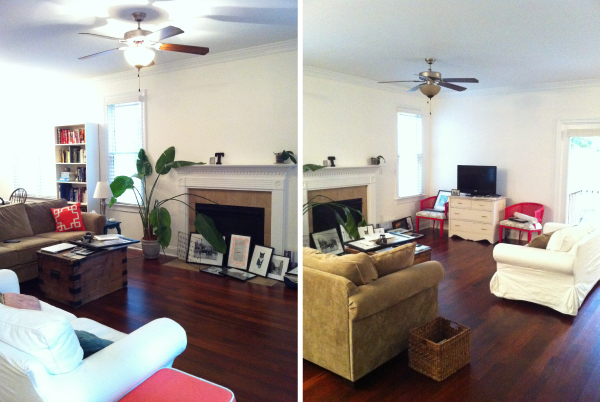
And after:

Anyone else purchase a rug recently? Did you find it as nerve wracking as I did??
*Though we are very happy with the look, I’m taking 10% off because it’s not as soft as I had hoped (duh, it’s wool). We don’t get down on the floor too much in this stage of our life, but I imagine it wouldn’t be the most comfortable for kiddos in the future.