Today’s post is just the tiniest hack, but one that’s made a big difference over the years in making the most of my clothing budget. Here it is: at several points in the year, I’ll review my purchases and consider whether they were money well spent — or not.
To back up a bit: like everyone, I don’t want to waste money on clothing. I want to feel great about what I buy, whether it’s a steal-of-a-deal thrift find or a highly-anticipated splurge. I don’t want new purchases to sit in the closet, gathering dust, either because of the material, the style, how they fit, or how they sit on my body. I want to love what’s in my closet and feel good about any money I’ve spent!
But, also like everyone else, I don’t always get it right. Sometimes I think I’ll wear something, but it never ends up being what I reach for — maybe the style feels impractical, the material isn’t comfortable, or I just don’t have the right place to wear it. Occasionally, I’ll get suckered in by a sale price. Occasionally, I’ll make a bet on a final sale piece that doesn’t pay off.
For me, pausing every so often to review my purchases helps me make better decisions in the future. My process is simple: around the turn of fall (late enough in the year that earlier purchases have had a chance to settle!), I’ll open up our budget doc and click to the clothing budget tab. There, I can see every purchase I’ve made this year, laid out plainly in front of me.
(If you don’t keep as detailed a budget as ours, this might be a little trickier — but you could still do a similar audit in your closet! Physically pull out the pieces you purchased in the last few months for consideration.)
Then, I’ll go line by line and highlight the items in green that have felt like great buys: I wear them, I’ve washed them, I love them. I’m so happy I spent money on them.
This, of course, lays bare the items that don’t get highlighted. Though it can be a little painful, I take a look at each line: what about it is holding it back from getting highlighted? Is it the price I paid? Is it the item itself? What insight can I tuck away that might keep me from making the same mistake in the future?
And… that’s it! I’ll do the same thing at the end of the year before I switch to the next year’s budget doc, marking up any purchases made in the last quarter. It’s quick, I try not to beat myself up about misses, but it’s really helpful for me to stop and look for what’s working and what’s not so that I’m not just spending, spending, spending, adding, adding, adding.
To close, here are just a few examples in each category from this year so far:
In the green category:
— These raffia ballet flats. I spent about $150 on them but they’re comfortable, they filled a need in my closet, and I’ve worn them all spring and summer. (And hey, if you like them, you can get them for wayyyyyy less than I paid – ouch, ha!)
— This striped pullover. (They don’t have my exact colorway, but this is the style!) I bought this in person on a whim this spring, and I hesitated over the price (a little under $100) – I hadn’t walked into the shop expecting to buy something like this! But, in looking over the list, this has been my absolute favorite thing I’ve bought this year and I wear it as often as possible. Absolutely worth it.
— A white v-neck tee and a white gauze shirt from Quince. Total workhorses in my wardrobe. I wear both of them most weeks and will year round. And at just $60 for both, a great deal.
— A magenta rain jacket. The rain jacket I’d had for years went missing last year, so I’d been casually on the hunt for a new one. I spotted this one in-store when I was looking for something else and took a gamble on such a bold color. It’s been the nicest splash of color on dreary days and I’m happy I bought it every time I put it on, even though that’s not that often.
And now for a few misses:
— A floral cap-sleeve top I bought from Tuckernuck on final sale. I have worn it once or twice, but probably wouldn’t have bought it if I could have tried it on in person – it’s just a little too fussy for me. And at $75, this one hurts.
— A teal and white striped long-sleeve tee from Alice Walk, also on final sale. While it’s so soft and I like the colors, the round neck is a tad high in a way I don’t love, so I don’t reach for it as often as I thought I would.
— An olive green dress from J.Crew. I did try this one on in-person, and I do like wearing it. But again, it’s a little fussy in the way it lays, so it’s not particularly easy to throw on, so I haven’t worn it much. If I had paid less for it I probably wouldn’t mind so much, but the $100 price tag makes it feel like more of a regret.
There are a few more in each category, but that gives you a taste! And hopefully, you can see how it’s easier to spot patterns that I can use in the future once I sort things into categories.
Your turn! I’d love to hear what your favorite clothing purchase of 2024 has been so far. And, if you’re feeling brave, maybe a miss, too :)
Around this time every year, I start to feel a little anxious about the coming year — specifically the finances of the coming year. By November, we’ve usually started talking about things like vacations we’d like to take, purchases we want to make, and savings goals we’d like to hit. We’ve submitted our pledge to our church. We know what our childcare expenses are going to be. But I don’t yet have a map of how it’s all going to fit together, and so I start worrying: will we be able to pay for everything we want to do? Will we have the money to take these vacations we’re talking about? Will we need to trim our budget, or will we get to expand it?
I hate that anxious feeling. And I think that’s how I’d feel every month if I didn’t have a budget, because a budget is a plan. It reassures me that I’ve taken care of everything that I need to, and that if I stick to the budget, I am free to spend money without guilt, I don’t need to worry about paying bills, and I can rest assured that I’m making progress on all of my savings goals.
I LOVE feeling like that. So this weekend, John and I sat down and made a plan for 2017. We do this every year, and I’d encourage y’all to try it, too! Here’s what we did.
We started by setting aside about two hours, after June was in bed so we wouldn’t be interrupted. We opened up a fresh Google doc and copied and pasted the structure of our budget (formulas, categories, etc. – you can read more about that here). Then we started adding in numbers:
First, we entered in any fixed amounts: numbers that we can’t change or don’t plan to change, on both the income and expense side. A few examples: our salaries, 401k contributions, taxes, and our mortgage.
Then, we moved to the “slightly flexible” categories: ones where we could make changes, but there’s not a ton of wiggle room and it would require a lot of effort. A few examples: childcare, cable and internet, charitable giving, and groceries.
Finally, we enter in what we’d like to spend in the flexible categories. A few examples: vacation, dining out, gifts, and clothing.
Depending on whether or not you’ve kept a budget in the past, it will be more or less challenging to pull these numbers. Since we have a lot of data to look back on, we were able to simply plug in a lot of numbers from 2016. Still, we do talk through each category to see if any adjustments are needed for the upcoming year: Are we due for new tires? Will we be flying more than usual? Will we be buying lots of wedding gifts? If you haven’t kept a budget in the past, look back on a month or two of receipts or credit card statements to help you estimate.
Now it’s time to look at the bottom line: With all of your projected income and expenses taken into account, is your budget for the year in the black or in the red?
If it’s in the black: great! When we have a less than $1,000 surplus, we leave our budget as-is, because that’s a small enough amount to us. However, if the surplus were more than $1,000, I’d want to assign that money somewhere (savings, giving, or an expense category), because the goal is for every dollar to have a job.
This year, when we first did the math, our projection was in the red. But no need to panic! This is why we forecast a budget, so we’re not realizing this next October, or whenever our bank accounts run dry.
If you’re in the red, too, it’s time to go back over all of those flexible and semi-flexible categories with a fine-tooth comb, and talk through any options for cutting your expenses. For us, we talked about reducing our vacation, home, clothing, personal care, and childcare expenses. We also decided to forgo one month of extra payment on our mortgage in order to make room for the additional money we want to give to our church’s building campaign next year. These are tough decisions, but I firmly believe it’s better to make them now, when you’re in control, rather than when you’re scrambling and your options are limited. Cut, cut, cut until your budget is balanced.
Once your numbers come out even, congratulations! You have a financial road map for 2017, and it’s going to be an awesome year!!
Your next step is to set up a system to track your budget every day, week, or month, like through a Google doc, an online system like Mint or YNAB, or the envelope system.
You’ll also want to make plans to check in periodically to see how you’re pacing – we do that every two months. After all, a budget is a plan, but plans can change. We adjust our budget throughout the year if our circumstances change or if we decide we want to prioritize one category over another. That’s totally fine to do, as long as the income and expenses balance out in the end!
I’d love to hear, friends: do you do any budget planning before a new year begins? How do you track your budget? Does talking about a budget give you the heebie-jeebies? Are there any money topics I can help you with in upcoming posts? I have a few brainstormed, but I would LOVE to hear what might be most helpful to you!!
Friends! Have any of y’all experimented with our Google Doc budget? I would love to hear if you have! If you haven’t, though, or never intend to, that’s okay, too — I know it’s not for everyone! The key to sticking to a budget is finding a system that works for you, and so, as promised, I’m presenting another option today. Or rather, my dear friend Nancy Ray is presenting another option — the one she uses. Take it away, Nancy!
Hello friends! I’m excited to share, in my opinion, the most important key to our budgeting success. It’s called the Envelope System, and if you haven’t heard of it, just ask your grandma. She can probably explain it to you! Before the days of credit and debit cards (which really wasn’t too long ago), this was the most common and effective way to budget your money and give limits to your spending habits, and it’s the method recommended by Dave Ramsey, whom we’ve learned so much from. It works like this:
After making your monthly budget, you fill your labeled envelopes with the cash allotted for each specific category. When the money runs out, it runs out! This creates a physical limit on your spending, and it helps pace yourself throughout the month.
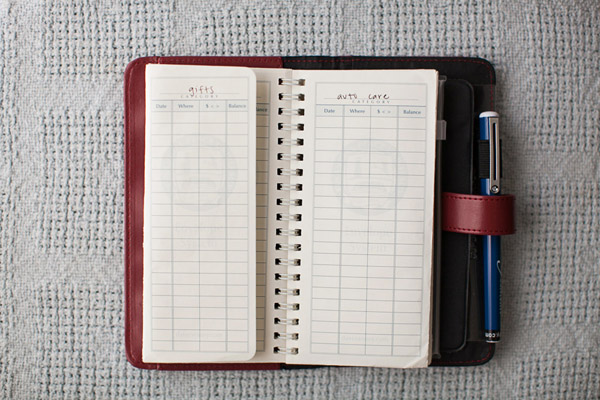
To better explain, here is an example of our current monthly Envelope System:
Food: $400
The food envelope is the amount allotted for all of our grocery shopping and eating out. Some couples like to separate the two categories into two different envelopes – that is completely up to you. (I like to challenge myself each month: If I have leftover money in the envelope, then we get to eat out!)
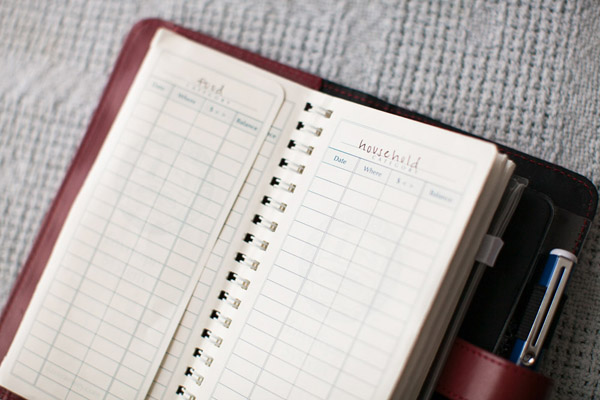
Household: $100
Household expenses include laundry detergent, lightbulbs, home repairs, paper towels, and other recurring household needs. We let this money “roll over” from month to month when we do not use it all, to cover the unexpected, more expensive repairs and needs that inevitably arise.
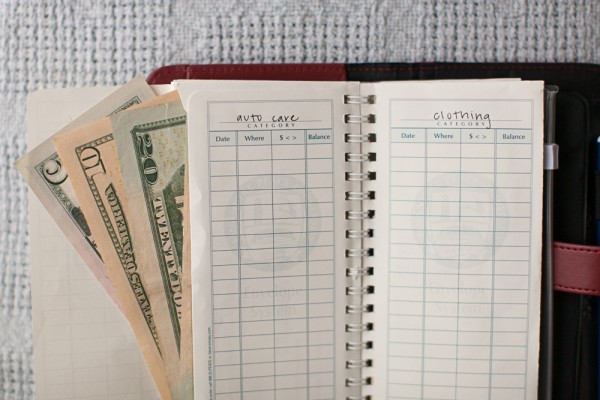
Auto Care: $60
The auto care envelope covers auto repairs, oil changes, tire replacements, car washes, etc. We allow this envelope to “roll over” as well, to build up cash for more expensive repairs.
Clothing: $60
The clothing envelope is only for clothes that are needed, not my fun shopping I-want-a-cute-new-dress money. For example: I can use the clothing envelope to purchase a new pair of running shoes because mine are worn out.
Blow Money: $160
We divide this money down the middle: Will gets $80, I get $80. This is our monthly “fun money” that we get to spend on whatever we want (i.e. my cute new dress.)
Gifts: $60
The gift envelope amount changes regularly, depending on what holidays and birthdays are on the calendar. Nothing is a surprise! We budget for Valentine’s Day, our families’ birthdays, and we start budgeting for Christmas in September!
Hair: $25
I don’t need a haircut monthly, but Will does. We allow the extras in this envelope to roll over and build up for my haircuts, while Will regularly takes out what is needed for his.
Date Night: $40
This is our newest envelope (and perhaps my favorite!). Setting aside time for us to simply be together, the date night envelope can be applied to a movie night, a restaurant, or maybe two date nights: pizza at home, and a casual dinner out.
Other Envelope System Category Ideas:
– Restaurant/Eating Out Envelope
– Entertainment Envelope
– Social/Friends Envelope (for coffee/lunch dates)
– Furniture Envelope (if saving for a new piece of furniture)
– Vacation Envelope (if you want to keep it separate from your bank account)
Side note: When we were saving to pay off our house, we only got $40 each of blow money monthly. Also, there was only $240 in our food envelope, which is quite different from our current $400. The point is this: YOU decide what is fair in your household, according to your income, budget, and financial goals. Don’t get caught up in comparing my budget to yours. Do what works for you.
A few things to note before moving forward: This is not a picture of our entire budget – only the cash items within our budget. Notice that none of our bills (electricity, internet, etc.) show up in the Envelope System. That’s because we pay our bills online, electronically. So while they are still a part of our budget, they are not withdrawn in cash. Same with our gas money – we always use our debit card when filling up, and we keep track of our receipts and budget for it. Also, keep in mind that these amounts change on a monthly basis. For example: we hosted a dinner party for friends last month, so we allotted extra money in our Food envelope to cover that additional expense. The Envelope System exists to help you stick to your budget when spending can become all too easy, but it does not represent your entire monthly budget.
5 tips to make the Envelope System work for you:
1. Use cash-only categories: As I mentioned before, only use the envelope system for items you can pay for in cash. 2. Personalize it: When we first started using the Envelope System, we had a bajillion envelopes. I even made sub-categories for my blow money envelopes: my iPhone envelope, my curtains envelope. Just get to a system that is agreed upon in your household. 3. Fill the envelopes once or twice a month: I fill all of my envelopes in the beginning of the month to the max, but you might feel uncomfortable carrying around that much cash. You can fill them twice a month if needed – just choose something consistent and make sure you make a note in your budget. 4. Communicate with your spouse: This goes for your budget and your finances as a whole, but it’s good to talk through the envelopes and the remaining balances as you spend throughout the month. 5. Trash your receipts: I love this part of the envelope system. Because we can simply glance down and look at how much is left in each envelope, there isn’t a real need for keeping track of our receipts. It’s a good idea to keep track of them for the first few months, but once you get the hang of it, the envelopes eliminate your need to keep receipts.
So why is this system SO important to us? Why can’t you simply use your debit card and keep good records? I’m so glad you asked!
First of all, in my experience, it’s much more difficult emotionally to spend cash. It is often much easier to simply swipe your card and justify your purchase.
Second, this system sets a hard limit on your spending. You simply cannot purchase anything else when there is no more cash in the envelope! For visual people like me, this aspect is very helpful.
Lastly (and most importantly in my opinion), the Envelope System allows you to spend your money GUILT FREE! When you and your spouse have agreed on the amount of cash ahead of time, you can spend it responsibly, without worry. I used to have major guilt when spending any of my money, knowing that it could have or should have been spent on something else. But with a budget and an envelope system in place, you can freely spend what you’ve allotted with no guilt, knowing you are being responsible with your money.
Keep in mind it takes about three months to get the hang of this or any system, so don’t give up if it doesn’t work right away. But it is worth it, I promise. No matter my income or age, I will always use this system. I dare you to give it a try, and let me know what you think!
Thank you, Nancy!! Be sure to check out Mrs. Ray’s inspiring blog and beautiful images here!
Today is the day! The day I’m going to walk you through exactly how John and I track our budget. By the end, you might think I’m a genius, or you might think I’m absolutely insane. Maybe we’ll take a poll :)
The reason I say that is because it is not the simplest system (at least on the surface), but it works very well for us. And that’s the point — if there’s one thing I’d like for you to take away from these posts, it’s to find a tracking system that works for you, and stick to it. It might take several tries to find a system that is aligned with your strengths and guards against your weaknesses, but once you find it, you’ll be golden. Seriously, if you can stick to a budget, I truly believe your life possibilities will expand rapidly in front of you.
Alright, on with it. Our system was custom designed by John on Google Docs. (To give credit where credit is due, it was inspired by a budget Jenna’s husband designed.) Let’s start by laying out a few pros and cons of our system:
Good for someone who:
— is incentivized by saving
— is a more natural saver than spender / likes to know exactly where her money is going
— likes to look at spending data over time
Bad for someone who:
— does not have an interest in record keeping
— is prone to overspending
There are a LOT of moving parts to our budgeting system, but I’ll walk you through them. John has put together a dummy copy of our budget for you all to use if you’d like, and it will probably help to open that doc in another tab so you can reference it while you read. To start using our dummy doc for yourself, open the doc, click on File –> make a copy, rename it if you’d like, then click OK. Remember to MAKE A COPY before you start entering your info, or else you’ll be editing the original doc and everyone will see your info! :)
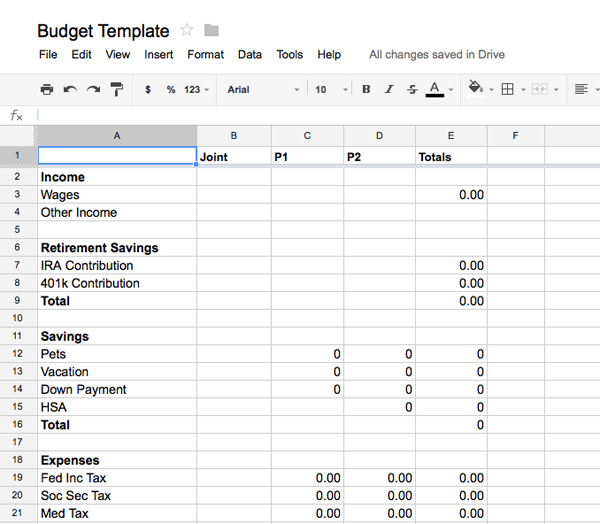
Our budget is made up of several sheets — 100, to be exact. I know that sounds like a TON, but bear with me! The doc starts out with a number of aggregate sheets, then goes into the Person 1 section, then the Person 2 section, then the Joint section.
The first sheet in the doc is the Income-Savings-Expense Sheet, or ISE for short. This helps us see the big picture of all of our moving parts at once, and how they interact with each other. We actually enter very little manually into the ISE — most of the data is fed in from other cells through formulas. There are also formulas built in so that when we get to the bottom, all of our income, savings, and expenses are automatically calculated. When we’re establishing our budget for the year, the goal is to have just a small surplus in the “remainder” cell. Feel free to adjust our categories for your needs, but make sure that every Expense category has its own corresponding sheet.
The next two sheets — Expenses Actual and Income Actual — are also important for an overall look at things. Expenses Actual pulls in data from all of the other sheets to show you how your actual spending is lining up to your budgeted spending. The sheet nicely totals the difference for you at the bottom, and puts you in the red if you’re over. John also built in bar graphs for an additional visual aid. Again, this sheet populates automatically based on formulas, so it’s just for you to look at.
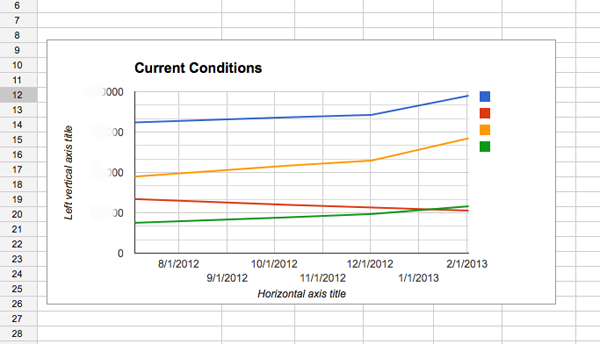
Income Actual shows you your actual income compared to your actual spending (a number drawn from the Expenses Actual sheet). Bar graphs are also included here. Again, all populated automatically. This is a (partially blurred out view) of our actual sheet:
You still with me? We’re through the most complicated parts!
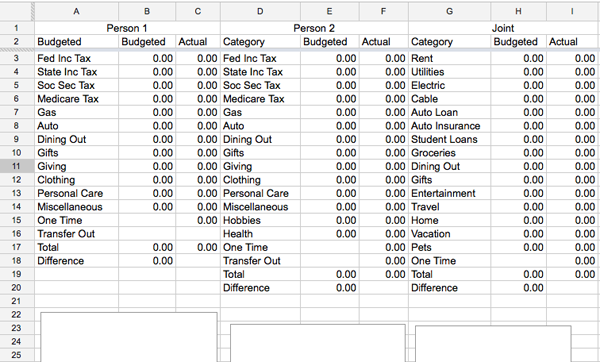
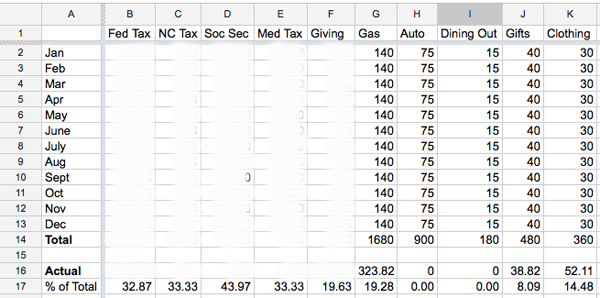
Our next sheet takes us into the Emily, or Person 1 section of the budget. Across the top runs all of the categories my expenses fall into — things like gas, dining out, giving, and clothing. All of my taxes — federal, state, medicare, and social security — are accounted for here, as well as my savings contributions — currently, vacation, down payment, and kitties. This is where you’re telling your money where to go, so if you want it to go to savings, then that needs to be laid out in your budget.
The total amount spent in each category for the year is totaled automatically by formula in the “Total” row. Beneath that, in the “Actual” row, the actual amount spent so far in the year is pulled from the individual budget sheets, and then beneath that, the percent of the total that’s been spent to date is calculated. So, you can see that I’ve spent $323.82 on gas so far this year, which is about 19% of my total budget of $1,680.
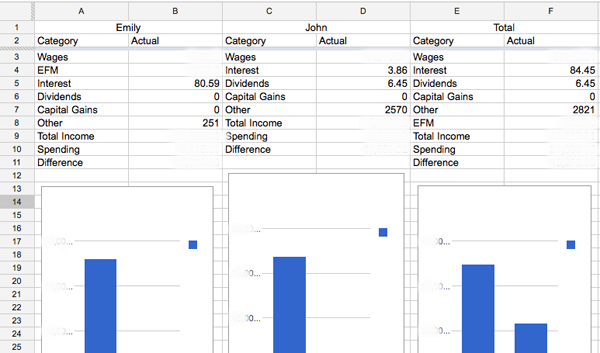
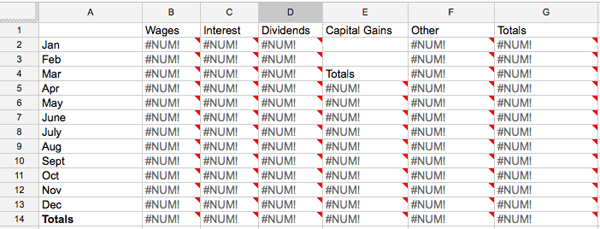
On to the next sheet, Person 1 Income. You don’t really need to worry about this sheet, because it will automatically populate from other sheets. Handy for showing what percentage of your income comes from what source (with the aid of a pie chart, of course).
Don’t mind all the little NUMS – that’s just showing that there’s a formula for the cell that’s currently empty, because there’s no data in the dummy doc yet.
The next five sheets — P1-Wages, P1-Interest, P1-Cap Gains, P1-Other Inc, and P1-Dividends — are where you’ll enter your income data throughout the year. For example, if you get a paycheck, you’ll enter it in the wages sheet. It’s important to note here that you need to enter your GROSS wages, not your NET wages, since you’ll later subtract things like taxes as an expense. If you don’t, for instance, have capital gains, then feel free to delete that sheet. We use Other Income for things like an unexpected birthday gift.
Whew! If you’re still with me, you’re going to be golden from here on out, because this is where it gets easy. And really, all of the above is easy to use in practice, it’s just hard to explain when I’m not sitting next to you and we’re not looking at real numbers. The bulk of the sheets are simply to record your expenses. You’ll want to customize these sheets to whatever your expense categories are.
The first four expense sheets are the items that are deducted from my paycheck every month — federal income tax, state income, social security, and medicare. For P2, we also have sheets for 401k, HSA, long term disability insurance, and life insurance. Obviously, feel free to add or subtract to customize things for your situation! If you’re not used to tracking these numbers, you should be able to find them on your pay stub.
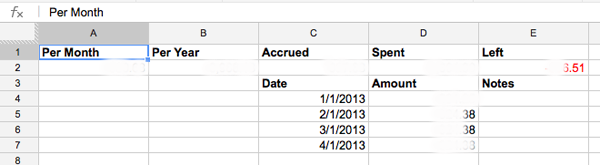
Now is as good a time as any to explain the basic premise of our budget. Once you’ve set the amount to be spent in each budget category per year (in either your personal budget sheet or the joint budget sheet), the formulas will automatically divide that number by 365 to get the amount of money that accrues per day. The daily amount will add up in each sheet’s “Accrued” cell. Whenever you spend money (by entering the individual transactions in the date/amount/notes cells), the total amount of money spent will add up in the “Spent” cell. If Accrued – Spent is a positive number, then the text will be black; if it’s negative, it will be red. Instead of starting with $30 in my dining out budget, I start with nothing, and the amount in the budget grows day by day. Instead of diminishing, our budget grows!
Another element that’s key to our budget is that we almost NEVER pay with cash, because cash is hard to track (unless you’re incredibly diligent with your receipts). Checks, credit cards, and debit cards are easy to track. Obviously, credit cards must be paid off in full each month for this system to work; the subject of credit cards is deserving of a post in itself so I’ll leave it at that for now.
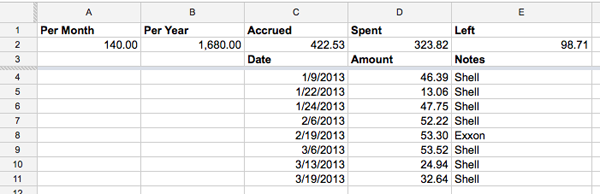
The remainder of the sheets in the P1 portion of the doc are for expenses that aren’t static, like gas, clothing, etc. Just enter these transactions as they happen. For example, this is what my gas sheet looks like right now:
Make sense? All of this repeats exactly for the Person 2 portion of the doc. If you’re a single person, just delete the P2 sheets and add the appropriate Joint expenses into your budget, too! Joint sheets follow the P2 sheets.
Here’s a brief rundown of my expense categories that aren’t immediately obvious: Auto: Includes regular expenses like oil changes as well as irregular expenses like new tires or new brake pads. Since we never know what’s going to happen to our cars, we try to budget generously for this category, which means we often rack up a surplus. Giving: Includes our pledge to our church as well as annual gifts to our college, donations to other charities, supplies for things like Operation Christmas Child, etc. Personal Care: Includes toiletries, makeup, hair cuts, co-pays, contacts, etc. Transfer Out: We enter our retirement account contributions here. We’re not actually “spending” them, but it’s money leaving our accounts that we’re making inaccessible for the moment, and we like to track where every dollar is going. One Time: We use this for large, unexpected expenses that we’re paying for out of savings, not a yearly budgeted category. For example, in 2012 my one time expenses were the dress I rented for our friends’ wedding, my contribution to the house rental for my sister-in-law’s bachelorette, and John’s wedding present. Your one time expenses should be very rare, and not just a place to hide your non-sanctioned spending. As a rule of thumb, you should be able to count each year’s one time expenses on one hand.
Almost there!! The last two pages might be a little confusing, but for us, they have been one of the biggest financial motivators at our disposal. They are the Net Worth and the Net Worth Over Time sheets.
To use the Net Worth sheet, plan to take stock of your financial situation with your partner every two months or so. Put those dates on your calendar! On the designated days, go through every one of your accounts — checking, savings, student loans, car loans, IRAs, 401ks, HSAs, the works — and note the amount in each. For debts, note the outstanding amount (you can usually do this by signing into your online account or by calling your lender’s automated phone system).
After the formulas do some work for you, enter the required numbers — Assets, Liabilities, Net Worth, Net Worth ex Retirement — into the Net Worth Over Time sheet. Once you’ve been doing this for a few months, you’ll use your data to build a graph. Ideally the line will trend upward (if you’re gaining assets and shedding liabilities), which should provide even more inspiration to keep on the straight and narrow financial path! Here’s what our graph looks like since August 2012:
Friends! How are you feeling?? Have I totally confused you? Excited you? PLEASE let me know what you think and if you have any questions at all! There’s certainly more detail I could have added in, but this post was long enough already. Remember, you can access the dummy doc here!
And, take heart! If you don’t think this system is for you, a special friend will be visiting us next week to offer up another solution.
P.S. I would be COMPLETELY remiss not to acknowledge John here, who created our entire budget system, made the dummy doc for y’all, and diligently proofread this post to cut out the maximum amount of nonsense talk! He is truly marvelous!!