30 April 2009

I’ve loved this photo {above} since I saw it in the fall issue of Martha Stewart Weddings a few years ago. Serving lemonade or iced tea before the ceremony is such a sweet touch, and these little fabric flags are an easy DIY extra.
Instructions from Martha: With gardening shears, trim a wooden skewer so it’s a few inches taller than the glass you’ll put it in. Cut a 9-inch length of 15-millimeter grosgrain ribbon. Fold in half and make a loose knot. Slip knot over skewer and tighten. Notch ribbon ends.
I always love seeing projects from editorials in real weddings {especially from Martha, as she can be quite intimidating…}. These colorful swizzle sticks are pretty spot-on, aren’t they?

See the rest of this wedding on Style Me Pretty.
8 April 2009

Hello, friends! Guess what? DIY Wednesdays are back! This week, I’ll be showing you the lined envelopes and embellished cards I recently made for a friend’s birthday. Both are super easy and extremely satisfying projects.

Let’s gather our supplies first, shall we?
cutting mat
straight edge or ruler
pencil
thick cardstock
bone folder
adhesive (I used a Tombow permanent roller)
Martha Stewart edge punch, available at Michael’s (use a 40% off coupon!)
an envelope
patterned paper
coordinating thick stock cut to fit your envelope
x-acto knife
First, the cards, and really, they couldn’t be easier – but they look fabulous! {Psst… it’s all thanks to Martha!}

1. Cut your cardstock to fit your envelope if it doesn’t already. Make sure your card is at least a 1/2-inch narrower than your envelope for easy ins and outs.
2. Using a Martha Stewart punch, carefully punch out a design along the bottom. Three tips: a) flip the punch over so you can see where you’re cutting (as in above photo); b) if your paper is textured, cut with the textured side facing the top of the punch to avoid rough edges; and c) when moving along the paper, overlap the edge that’s already cut just a tiny but so your pattern is continuous (in the closeup photo above, the tiny overlap is on the left – see what I mean?).
Et voila! A custom card for pennies.

Now for the envelope half of the equation, which is only slightly more difficult.
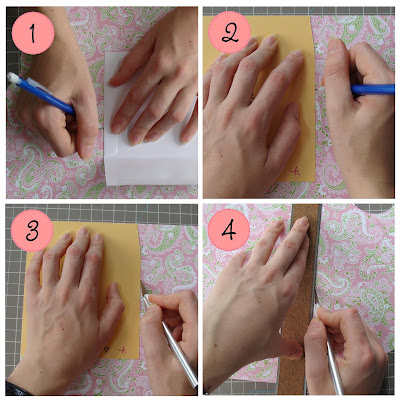
1. Trace your envelope onto patterned paper. Measure the width of your lick-’em-stick-’em strip (at the top of your envelope). Mine was a 1/2 inch, so I trimmed off a 1/2 inch from the top and both sides. If the top of your envelope is angled, be careful to cut the angle exactly.
If you think there are more lined envelopes in your future, or you’re planning to make a set like mine, I would highly suggest making a template at this point. All you need to do is trace your envelope insert shape on to a thick piece of cardboard and cut it out – it will be much sturdier and last much longer than thin decorative paper.
2. Working with your template, trace it onto the paper you’d like to line your envelope with.
3 & 4) If you’re feeling brave, skip the tracing step and cut directly around the template with an x-acto knife. Otherwise, line a straight edge up with your tracings and slice away.

5) Ta-da! Now you’ve got a correctly-sized insert.
6) Insert it into your envelope.
7) Line your straight edge up with the crease in the envelope and imprint the crease on your liner with your bone folder. Fold the liner on the crease to make it even deeper.
8) Remove the liner from the envelope and glue along the edges, taking special care with the flap.

9) Carefully reinsert the liner into the envelope, making sure it is evenly spaced from each side.
10) Run your hands over the back of the envelope to smooth things down and secure the glue.
11) Fold the liner…
12) and then fold the flap down, running your hands over the flap to secure.


Done and done!
2 April 2009
If you’ve loved yesterday and today’s silhouettes as much as I have, and are now in the market for one or two of your own, I’ve got some resources for you!
First up, The Man himself, at least in the world of silhouettes. He’s been featured in Martha Stewart Weddings, as well as in the wedding of M & C (featured here). Here he is cutting away at Katie and Ian’s wedding:

And here is the link to his company, Cut Arts.
Besides Karl there are so many fabulous artisans out there making innovative silhouettes, like this one made from wood by Jenny Lee Fowler…

… or this one of patterned paper by Bitty Starr.

Or, if you’d prefer to go the DIY route, Mrs. Green Tea just wrote up a super-informative tutorial on making your own silhouettes and using them in graphic design projects. Check it out here.
5 March 2009

{c/o Country Living}
A friend is planning a May bridal shower based on this inspiration board {so excited to see someone actually bringing the inspiration into reality!}. She’s planning to make the garlands in the top left photo, so last night we plotted her construction plan of attack. I thought others might benefit, so here are the resources I shared.

{c/o Country Living}
The original inspiration came from Country Living, and they do provide instruction on their website, though minimal.
“To make flags, triangles of coordinating cotton fabric are cut with pinking shears. Muslin triangles are printed with bird motifs and stitched to every fifth flag. To hang, the flags are stitched to a colorful length of seam binding.”

The Purl Bee {love the Purl Bee!} has a much more detailed guide, including templates and a step-by-step photo tutorial. Check it out here {and stay to browse the rest of their absolutely lovely projects}. Their book is on my wish list!


